

Configuring a new docMgt instance from scratch can seem like a daunting task. There are a lot of variables to consider such as how to organize the information, how to apply security, whether or not to allow public access to certain data and more. While it can seem endless it can be managed very easily with a simple Configuration Checklist.
This article is a checklist for docMgt configuration. In this article we will review the key areas with some detail and links to even more detailed information to help you work through the process. At the bottom of the article you will find a Master Checklist for your use.
docMgt Configuration Checklist
-
[icon name=”check-square-o” class=”” unprefixed_class=””] Branding
-
[icon name=”check-square-o” class=”” unprefixed_class=””] Support Information
-
[icon name=”check-square-o” class=”” unprefixed_class=””] Email Settings (premise only)
-
[icon name=”check-square-o” class=”” unprefixed_class=””] Users, Teams and Security
-
[icon name=”check-square-o” class=”” unprefixed_class=””] Record Types
-
[icon name=”check-square-o” class=”” unprefixed_class=””] Workflow
-
[icon name=”check-square-o” class=”” unprefixed_class=””] E-Forms
Branding
Branding is the process of customizing the docMgt interface to have your desired look and feel – including the Login Screen, Toolbar, Content Pages, Emails and Popup Dialogs. The decision of whether or not to customize the interface is usually answered from either a corporate or sales perspective.
Some companies have corporate requirements (or desires) to have all system conform the corporate standards for colors and logos. If this is the case then your decision is easy – yes you need to brand the site.
Other companies base this more on a sales approach. It may come up in meetings that employee acceptance of the new system will be a priority. In that case branding can help “sell” the employees on the new system and make it easier for them to adopt it. In other cases, it may be middle management trying to “sell” the new system to the board or other managing entity in the company. Branding the system for your board presentation can go a long way to selling them on the system as well.
If you need or wish to brand the site then this section is one you need to review. Here are some articles that explain branding and how to do it.
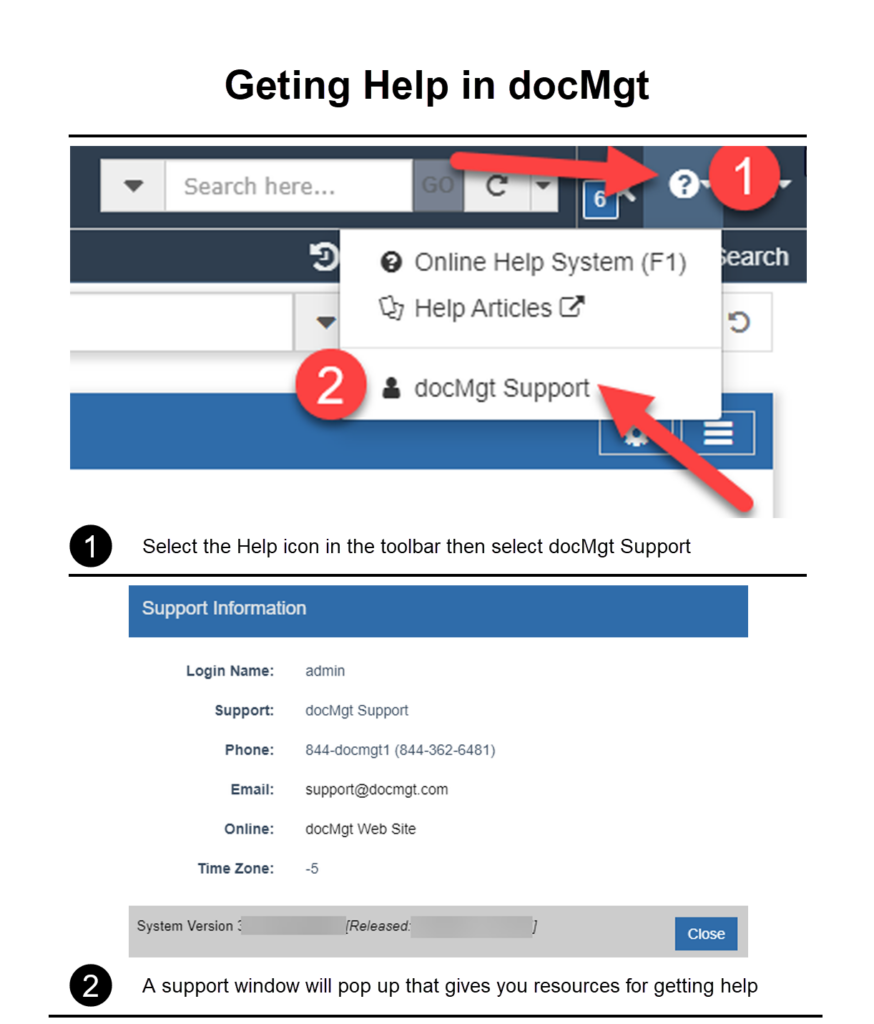
Support Information
Don’t forget to set the support information for your site. When users need help there is a support link they can click. This will bring up a panel that shows who to call or where to go for help. Make sure to set that information accordingly so your users can get the help they need quickly. The image below shows what the users see when they select the Support link. In your site’s Main Options you can change these values to be your own. This helps users get the most out of their docMgt experience!
Email Settings
If you are setting up a premise system you will need to be sure to set your SMTP settings. Premise systems need their own SMTP (Email) server for sending email notifications. Without it no workflow notifications will be sent. In your site’s Main Options you can set the SMTP Server values. You will need the following information:
- Server URL or IP Address
- Server Port
- SSL Requirements
- User Name
- Password
Users, Teams and Security
In order to use the system, users will need logins and will need to be provided access to the system in general. This is typically not a “yes or no” decision. However, you more than likely need to discuss and decide on security protocols when dealing with Users accessing certain information. The information you uncover when asking about security will tell you how to approach this in docMgt.
The most pointed question to ask for Security is:
“How many people are going to use the system” or “Is it just for one department or for the entire company?” The answer to either of these questions will help you determine whether to set the Base Security of the system to “No Access”, “Read Only Access” or “Read/Write Access”.
- No Access – Users of the system will not have access to any Record in the system unless they are given explicit access through Record Types. This option is best when you are supporting more than one department or when one department has sensitive information.
- Read Only Access – Users of the system will have Read Only access to all Records in the system unless they are given different access through Record Types. This option is best for a single department with differing duties but nothing sensitive from one another.
- Read/Write Access – Users of the system will have Read/Write access to all Records in the system unless they are given different access through Record Types. This option is best when you have a single department where all users share basically the same duties.
The “how many” question also helps you determine if you even need Teams. Sometimes you don’t need teams – especially with a system with a smaller user count. Remember – all security settings can be done at the User and/or Team level so you don’t NEED to have Teams. Personally, unless I always use Teams – even if it is a team of 1 person. That way if I need to change out responsibilities (i.e. someone quits, the department grows and adds people, etc.) we simply update the Team and all their work is automatically sent to the right people without changing workflow or permissions.
Once you determine your base security then you can configure the Record Types (see next section) to accommodate the system’s security needs. The following article describes adding Users and Teams in detail. The next section talks about Record Types in more detail as well.
Record Types
Record Types are the hinge pin of the entire system. They provide the foundation for the security, organization and ease of use in the system. For that reason they are very important to do correctly. And to do them correctly you need to understand them.
These Record Types do not define “where” information goes in the system. All information is global (i.e. not in any particular cabinet) so instead, Record Types define what a certain type of information “looks like” and how to treat it. For instance, you may have a record with 5 fields: Vendor, PO Number, Invoice Number, Amount and Due Date. You can tell the system that any time a record has those fields that the record should be secured to only the Accounting department and when it comes through the system it needs to be indexed by a specific team of users. This is all handled by Record Types.
The important thing to note here is that this enables you and your users to supply information into the system more easily. They won’t have to worry about where to put the information and how to secure it because the system will “look” at the information coming through and secure it for them.
When it comes to Security – that is all applied at the Record Type level. So, without proper Record Types you cannot have proper Security. Don’t worry though. Once you get familiar with the system this will be a very easy part of the set up.
For more information on setting up Record Types and some other useful information related to Record Types, see the following articles.
Workflow
Workflow can be described as the movement of tasks and information from user to user in order to complete a larger process. Examples abound in our every day life and we participate in various forms of workflow all the time. Any time you forward an email to a colleague to have them help you complete a task, that is a basic workflow. Any time you or a coworker submit an Expense Report and that reports gets reviewed, approved and paid – that is also a workflow.
You know you will have to create some type of workflow when you hear words like “process” or “approval.” Any time you need to have a set “process” for completing a task or have to get an approval for something within the system workflow is the way to go.
One important testing note that we live by here at docMgt is to set up your workflow with all steps going to your test user. YES that is ONE single user for all your steps. This will help speed up testing by allowing you to see all the workflow interaction without having to log out and back in as different users. Once the workflow is moving to the proper steps, updating the proper values and all other things THEN change assignments. The last rounds of testing should be with all the proper users configured. By then you have already tested the main workflow and are simply reviewing that each user has proper rights and views.
Read through this series of Workflow articles to help you navigate creating and maintaining workflows.
- Workflow Part 1 – Intro to the Basics
- Workflow Part 2 – Intermediate Configuration
- Workflow Part 3 – Action Types
- Workflow Part 4 – Work Trigger Methods
- Follow-Up Actions
- Workflow Expectations
- Workflow Filtered Assignments
- Workflow Processes
E-Forms
Electronic Forms (E-Forms) allow users to interact with docMgt in ways other than standard screens. With E-Forms users can view and enter data, view documents and even interact with outside users by allowing public access to specific E-Forms automatically. E-Forms have many roles in docMgt – internally, externally and within Portals.
Internal – E-Forms are used internally for things such as Expense Reports, Time Cards, Support Call Logs, Time Off Request and more. Internal users can create an E-Form from their toolbar and start any number of processes.
External – E-Forms can also be published out for external users (users who do not log into docMgt). These External E-Forms are used for processes such as Requests for Information, Contact Us Forms and more. External users typically get to the E-Form from a link on another web page such as a corporate web site or an email blast. Once they submit the form it creates a record in docMgt and starts a process internally.
Portals – Portals can do many things such as present information to users (internal and external), request follow up information (E-Form or Document Upload) and can participate in workflow. Portals are used for situations like Sales Fulfillment (asking for information), support case resolution (asking for information or sample documents), online registration (along with external E-Forms) and more.
When setting up a new docMgt system there may be times when you need to create E-Forms for data collection internally or externally. Read through the article below to see how to create E-Forms.
Testing, Testing, Testing
Congrats! If you have made it through this check list then you’ve successfully configured your docMgt site! To ensure all the work you’ve done is working as desired, test all facets of the site!
Master Checklist
- [icon name=”square-o” class=”” unprefixed_class=””] Brand your site
- [icon name=”square-o” class=”” unprefixed_class=””] Log in and test the branding view as each user
- [icon name=”square-o” class=”” unprefixed_class=””] System Admin
- Non System Admin
- [icon name=”square-o” class=”” unprefixed_class=””] Log in and test the branding view as each user
- [icon name=”square-o” class=”” unprefixed_class=””] Set your Support Information
- [icon name=”square-o” class=”” unprefixed_class=””] SMTP Server Settings (Premise only)
- [icon name=”square-o” class=”” unprefixed_class=””] Server URL or IP Address
- [icon name=”square-o” class=”” unprefixed_class=””] Server Port
- [icon name=”square-o” class=”” unprefixed_class=””] SSL Requirements
- [icon name=”square-o” class=”” unprefixed_class=””] User Name
- [icon name=”square-o” class=”” unprefixed_class=””] Password
- [icon name=”square-o” class=”” unprefixed_class=””] Create a desired Record Type and apply security
- [icon name=”square-o” class=”” unprefixed_class=””] Log in and test adding records, searching records and viewing records as a created user
- [icon name=”square-o” class=”” unprefixed_class=””] System Admin
- [icon name=”square-o” class=”” unprefixed_class=””] Non System Admin
- [icon name=”square-o” class=”” unprefixed_class=””] Log in and test adding records, searching records and viewing records as a created user
- [icon name=”square-o” class=”” unprefixed_class=””] Build and design an E-Form
- [icon name=”square-o” class=”” unprefixed_class=””] Log in and test submitting and viewing the E-Forms as a created user
- [icon name=”square-o” class=”” unprefixed_class=””] System Admin
- [icon name=”square-o” class=”” unprefixed_class=””] Non System Admin
- [icon name=”square-o” class=”” unprefixed_class=””] Public Users (if needed)
- [icon name=”square-o” class=”” unprefixed_class=””] Log in and test submitting and viewing the E-Forms as a created user
- [icon name=”square-o” class=”” unprefixed_class=””] Create a Workflow process
- [icon name=”square-o” class=”” unprefixed_class=””] Trigger the workflow
- [icon name=”square-o” class=”” unprefixed_class=””] Walk through the process to ensure it meets needs
- [icon name=”square-o” class=”” unprefixed_class=””] Log in and test as properly assigned users
- [icon name=”square-o” class=”” unprefixed_class=””] Load any initial data if available
- [icon name=”square-o” class=”” unprefixed_class=””] Log in and test as a created user
- [icon name=”square-o” class=”” unprefixed_class=””] System Admin
- [icon name=”square-o” class=”” unprefixed_class=””] Non System Admin
- [icon name=”square-o” class=”” unprefixed_class=””] Log in and test as a created user