Upload Documents Using SFTP
Most people don’t know you can upload documents into DocMgt using SFTP. SFTP stands for Secure File Transfer Protocol. Here is a site that explains SFTP. In short, SFTP is a secure and efficient way of copying data through the Internet. Several newer copiers support sending documents through SFTP as do several other software systems. Being able to accept documents through SFTP allows you to easily integrate with several other systems and processes with no programming required!
Setting Up SFTP
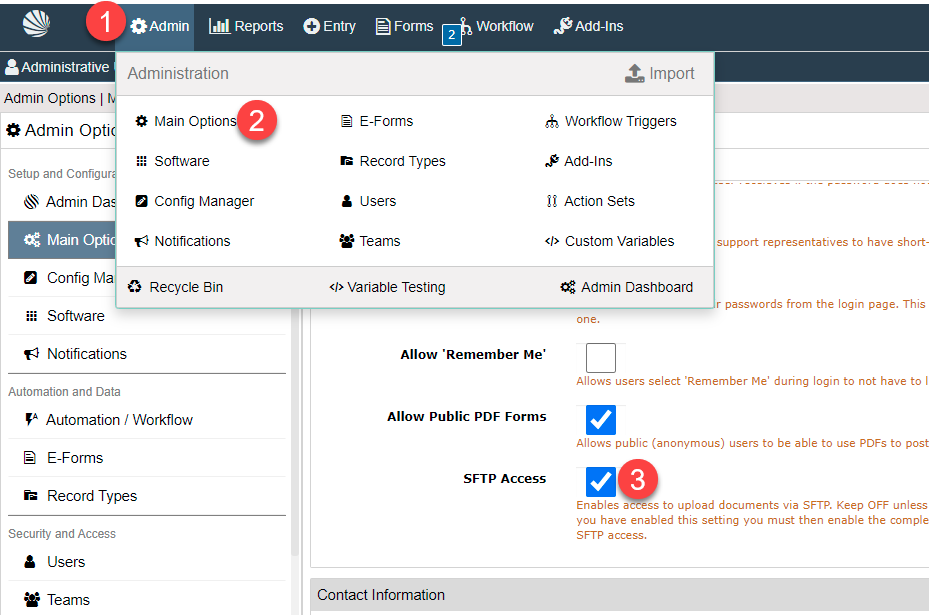
In order to accept SFTP you need to first enable that option in your site’s Admin section. Go to Admin / Main Option and find the Security Settings panel. Toward the bottom of that panel you will find an option labeled SFTP Access. Turn that ON to allow SFTP uploads into your system.

Next, you need to choose which Record Types you will allow SFTP uploads to go into. Go to Record Types / (Your Record Type) / General Settings and find the Security Settings panel. In the middle of that panel you will find an option labeled SFTP Access. Turn that ON to allow SFTP uploads into this particular Record Type.
At this point your SFTP link has been enabled and you can upload documents using SFTP.
Testing Your SFTP
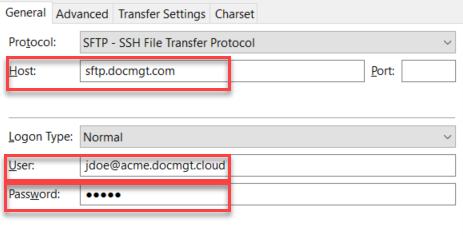
Use an FTP utility such as Filezilla to test your SFTP upload. The settings are fairly straight forward. Point the SFTP program to sftp.docmgt.com. This is the central URL for the SFTP uploads. Make sure your protocol is set to SFTP.
Set your username to user@site. For instance, if your site URL is https://acme.docmgt.cloud and your username is jdoe then you would set the username to jdoe@acme.docmgt.cloud. This tells the SFTP system which site to upload into. Then for the password field you would use your actual password. Note that we typically recommend creating a new user on your site just for the SFTP uploads.

When you connect to your site you will be presented with a list of folders. Those “folders” are actually Record Types from your site that have had their SFTP Access flag turned on. Click into one of those folders then upload a document. This will create a new Record in that Record Type and will place the document into that new Record.
A Few Details
There are some details about the SFTP process that are important. Make sure you understand these points to get the most out of your experience.
First, the SFTP interface it UPLOAD/WRITE ONLY. This means you cannot download from it – only upload. It also means that you cannot see any documents that are in it. In fact once you upload a document you cannot even see that document. So for systems that upload then verify the upload by doing a query for the file you will need to turn that feature off.
Second, the Records that are created will have no data in them other than the default value specified in the Record Type field definition. If you need to log the date / time that a Document or Record was created or a default status, make sure to do that in the default value of the field or by using workflow as described below.
Third, every Record that is created through the SFTP interface is automatically routed through workflow. This is almost always what is wanted. However, If you do not want them routed you have to handle that. If you don’t want them routed then be sure not to have any work triggers that match the incoming Records. Either that or have a trigger created that cancels the workflow for any items that you SFTP in.
Next Step to Upload Documents Using SFTP
You will most likely want to have workflow configured to handle the incoming documents. Remember that the only data you can upload with the documents is the default values configured in the Record Type. You will need to use those values or the absence of other values to get your workflow started.
Next, you need to configure the actual devices or programs that will be sending information. Configure them in the same way as the Filezilla definition above and you should be fine. Some systems are configured differently but the basics should be the same.
Other Resources
Workflow Part 1: Introduction to the Basics
