
Secure Portals Using E-forms
DocMgt Version 4.11 is a big release for DocMgt. This release added the ability to secure E-forms by more than just a simple password. You can now secure E-forms by having users log in and be authenticated against a Record. The are many scenarios for this but a few would be Customer/Vendor Portals, School Portals, Remote Worker Access, and more.
This article will step you through making secure portals using E-forms.
Step 1 – Select a Record Type for Authentication
In order to authenticate someone, you need to have record that hold their login information. This is NOT the same as the Users/Teams in the Admin system. This would be a whole new Record Type for holding the information. You may already have a Record Type that is perfect depending on your needs. For instance, if you are having vendors log in to check the status of their invoices, you can use an existing Vendor record.
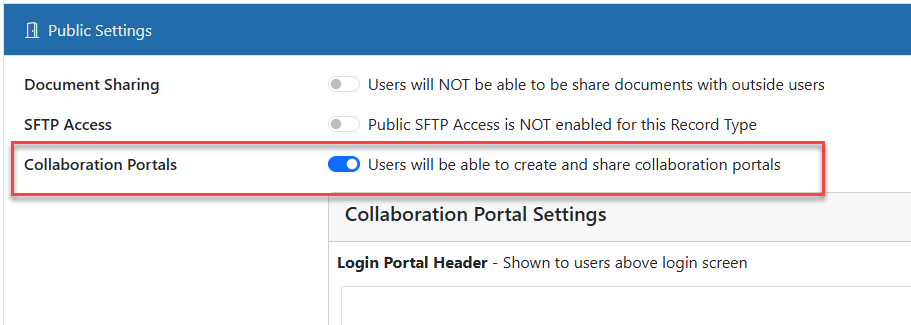
The only requirements for this that you turn on Collaboration Portals for the Record Type and you have 2 specific fields. In the Record Type settings, set the Collaboration Portals flag to ON. This tells the system that you will be authenticating users via standard collaboration portals or secure E-forms.
For the fields, you need one that holds a unique “token” or “ID” and another that holds their password. Typically, we recommend creating a unique ID that is NOT their Vendor ID or Name. Those can be guessed by outside users. We normally suggest a GUID (Globally Unique Identifier) that is created just for this purpose. You can use the [GUID()] variable to create one in workflow or wherever you need to set up the vendor.
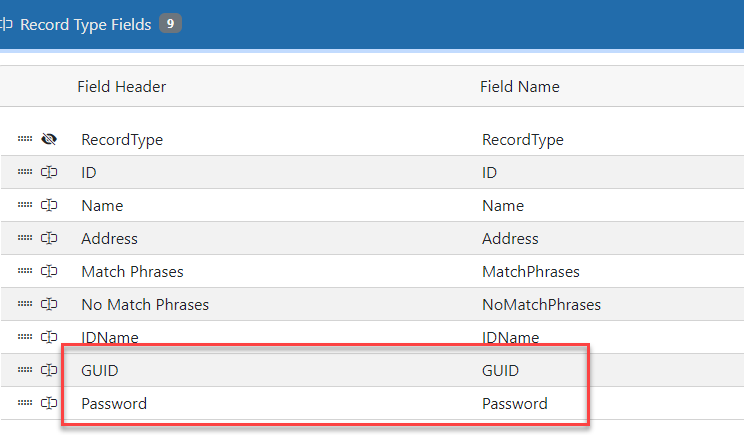
You don’t really need to define the fields in the admin area, but it does make it easier to configure. Once you have your fields ready, proceed to the next step.
Step 2 – Make a New Public E-form
Add a new E-form in the system and give it a useful name – like ‘Vendor Portal’. Then mark it as a Public E-form. You will find that option in the E-form properties, under the “Where to Show” panel.

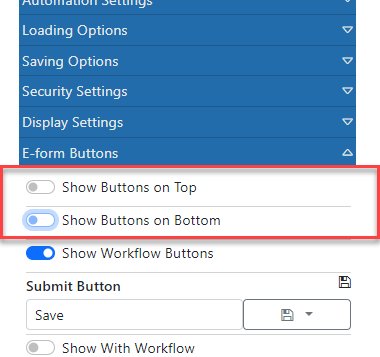
Turn OFF the E-form buttons by checking off the “Show Buttons on Top” and “Show Buttons on Bottom” options in the E-form Buttons panel. This makes sure no SAVE buttons show up. You don’t want users to save any data with this form – just search and view.
Step 3 – Configure the Form for Security
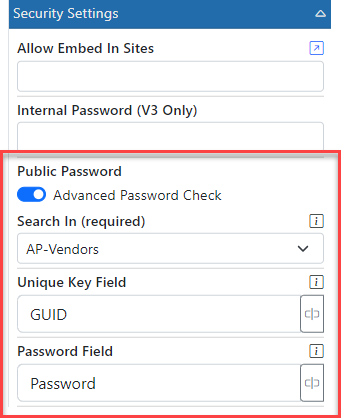
In this step, you will be making the connection between the form and the Vendor records. In the “Security Settings” panel of the form, turn ON the “Advanced Password Check” option. Select your authentication Record Type using the “Search In” option. For the “Unique Key” field, select your GUID field (or whatever identifier you have). In the “Password” field, select your password field.
The key to this system is based on 2 elements – GUID and Password. The Password is what the user will type in. The GUID is something that needs to be passed in on the address bar (URL) for the form.
When you send out the link to this form to the Vendor, make sure to add “?GUID=###” on the end so the system knows which GUID this link is for. If you use a name other that GUID for your field, then use that name in the URL.
When the E-form loads it will ask for the password. The system uses the password they entered along with the GUID from the URL to authenticate them.
Step 4 – Time to Test
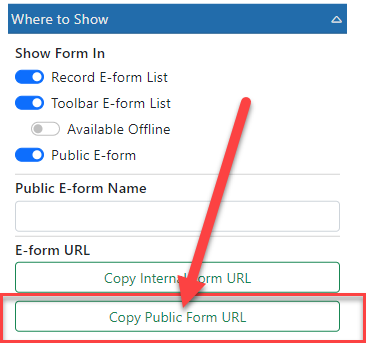
As long as you have a Record with a GUID and a Password in your Record Type you can test. The best way to test this is to use the “Copy Public Form URL” button to copy the external URL for the form.
Open an “In Private” window in your browser and paste that URL into the address bar. Then look up the GUID/Password combo for one of the vendors and add the GUID to the URL using “?GUID=###” (where ### is your GUID) and hit enter.

When you get prompted, enter the password and you will be logged in!

Step 5 – Add Some Info to the Form
Now that you can log in, it is time to display some information about the logged in user. Thankfully, that is pretty easy.
When the E-form authenticates to a Record, that Record becomes the active Record for the E-form. So, if you use fields from that Record Type you will be able to view and manipulate them like a normal E-form.
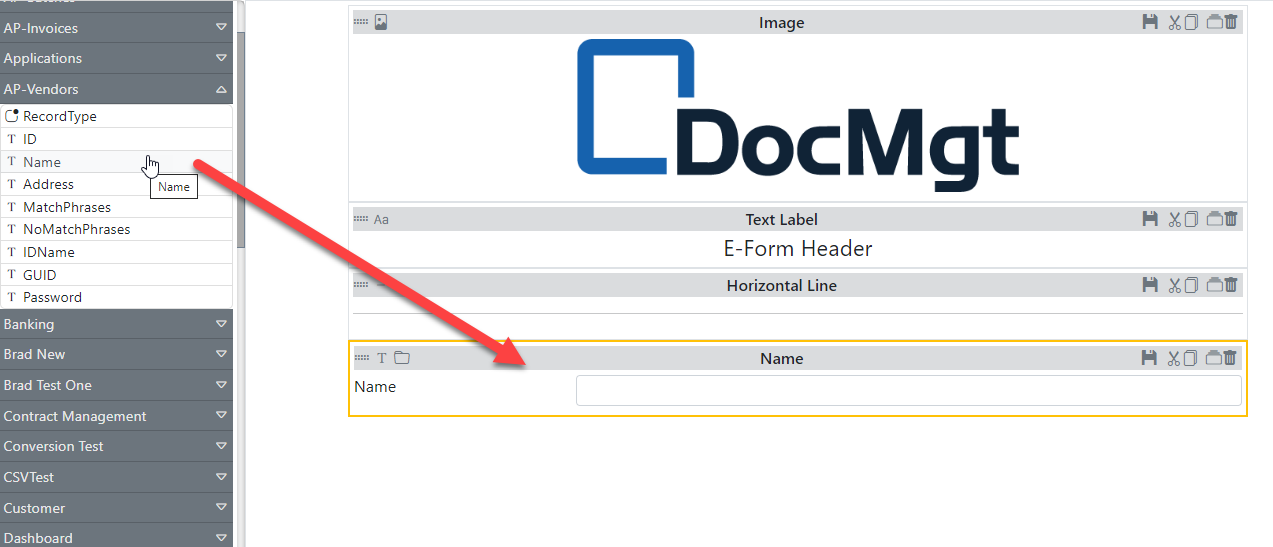
Drop a field from your Record Type’s fields from the toolbox onto your form.
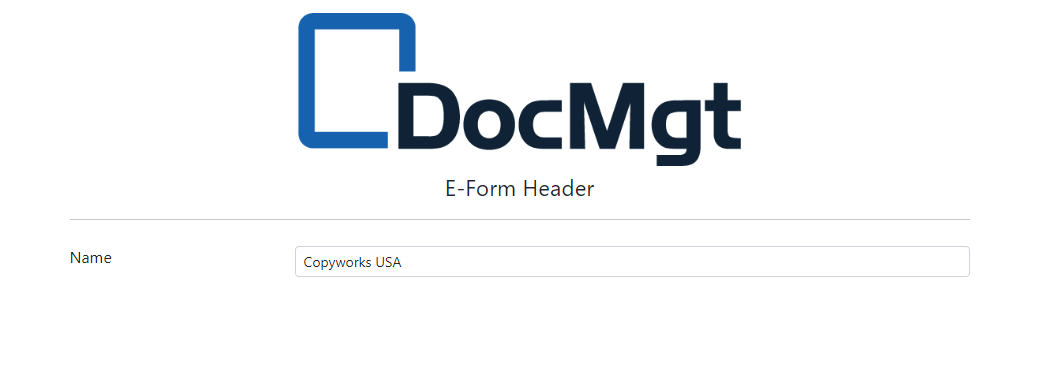
Save the form then reload your private browser. When the form loads you should see that field populated with the information from the Vendor Record.
Optional – Load Existing Documents
If you have not noticed by this time, this public portal has been limited to loading a new E-form that will save and create a NEW Document each time. This is useful for adding new content to the Record. But what if you want the outside user to see or update an existing Document/E-form and not create a new one each time?
Starting in Version 4.29, you can now add a new segment to the normal URL that you send the outside users. The normal URL consists of a form ID to know which form to load and a login identifier to know which login to use. In 4.29 and higher you can add a Document ID to the URL.
https://beta.docmgt.com/v4/public/form/129/123?GUID=###
In the example above, 129 if the E-form ID, 123 is the Document ID and ### is the login identifier.
In the process you use to send out the links to outside users, you will need to know the Document ID you want them to work on. Once you know that you can add that to your URL.
Caveats
-
-
- The Document must already exist
- The Document must be in the same Record as the login is linked to
- The Document must have been created from the same E-form ID as the ID sent in on the URL – 129 in this example.
-
If any of these criteria are not met, the user will see a fairly generic error message such as Document Not Available. And, as always, the true error will be logged into the Error Logs report.
Summary
You have successfully created Secure Portals Using E-forms! In the next article we will build on the E-form to make it more dynamic, run searches, pop up forms, and more.
Related Articles