
Searching in Secure E-forms
Secure E-form portals are a great way to provide services and information for your outside users. Once you have your secure portal ready to allow logins, there are a lot of options as to what to do with them. In this article we will focus on presenting the users with a menu of options including searching in secure e-forms.
If you have not yet read the article on Secure Portals Using E-forms, please STOP NOW and read that article first. That will walk you through the process of creating an E-form built for authentication. Then you can come here to continue the process.
Step 1 – Start Building a Menu
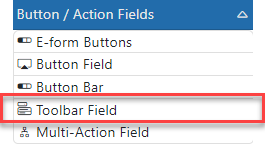
When a user logs into the system, we will want to give them a way to select what they want to do. You have a few options. You could (A) build out a series of buttons, (B) use a button bar field or (C) use a Toolbar field. In this exercise we will use the Toolbar field.
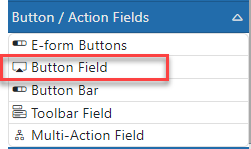
To start with, let’s clean up the form we had from our previous example. Delete the Image, Text Label and Horizontal Line fields. Then drop a Toolbar field onto the top of the form. You will find that in the “Button / Action Fields” toolbox.
One you have your toolbar in place, you can add options to make it look like a real toolbar. You can add toolbar options on the left or right side of the toolbar or on both. It is common to place the main options on the left and the less used options on the right. but feel free to set things up as you see fit.
The “Brand” setting allows you to add an image on the left side of the toolbar. If you have the URL to an existing logo, place it here. For our example will use the DocMgt logo form our web site. Feel free to use it for your example as well.
Image URL: https://docmgt.com/wp-content/uploads/2022/05/HorizontalDocMgtBlueBlack-e1654008737801.png
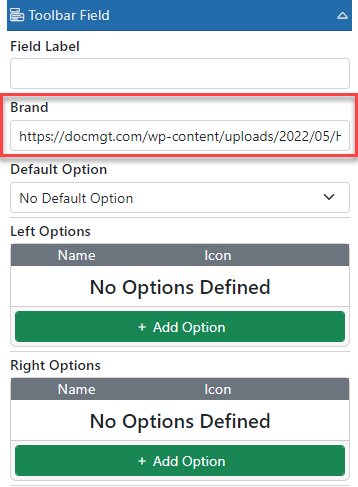
After you have the branding in place, you can add some options. Let’s start with the Left Options. Click the “Add Option” button in the Left Options section. When you do you will see a new Option in the list.
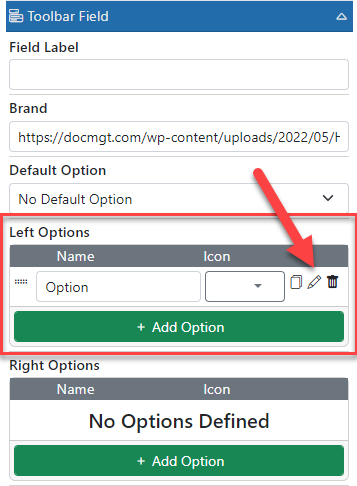
Click the Edit button to open that option so we can set its behavior. The “Name” setting is the text that shows up in the toolbar for this option and the Icon is the icon you can place next to the text. You can use both or either one, but you should not leave them both blank unless you don’t want the user to select it. “Type” is the action type that will happen when the user clicks the item. The other option on the form will change based on the Type selected.
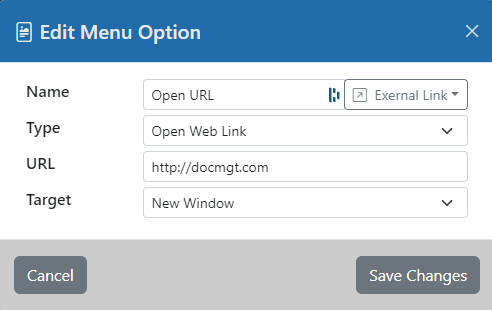
For this example, we set the first option to Open Web Link so we can open a new window to a Web site.
Step 2 – Test the Menu
Let’s save our form and open it to test the look of the toolbar. Not bad so far! Click the Open URL button to open a new window to the Web site.

Step 3 – Add Searching
Now that we have a basic menu, let’s do something productive with it. Let’s give the users a search option. You can either leave the “Open URL” option or replace it with this one – up to you.
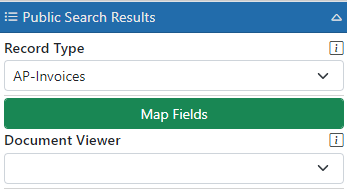
Add a “Public Search Field” onto the form. This is located in the “Data / Viewer Fields” toolbox. This has to be a PUBLIC Search Field because even though the user is authenticated with our form – they are still public with regards to the system. Select the Record Type that you wish to search. You need to be sure this Record Type is set up with the Collaboration setting. You can also search Public records but in this example, we will be searching the Vendor’s Invoices which are NOT public records. We will secure the search to only this Vendor’s invoices.
Click the “Map Fields” button to map the search fields.
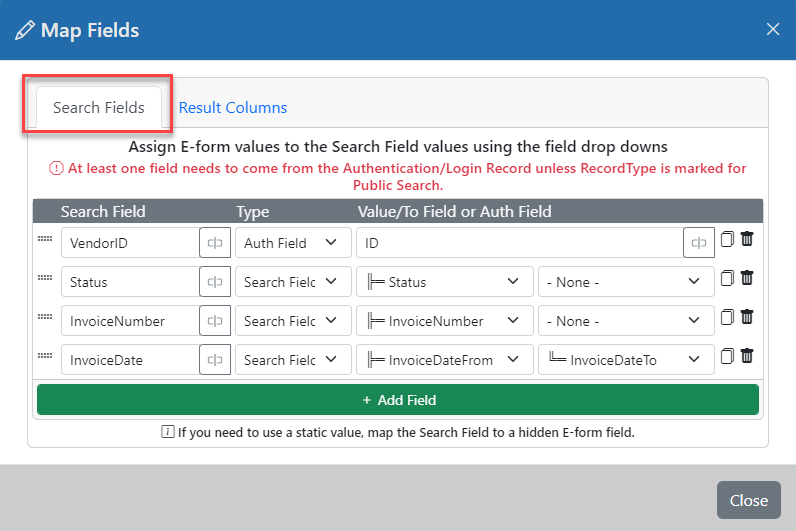
We need to add all the fields required to find their invoices. In this example, the only thing we NEED to do is specify the Vendor ID so those are the only invoices they can find. We don’t want to let them find any other vendor’s invoices! Add a field to the “Search Fieds” tab and in the left column select the name of the Field in the Invoices record type that holds their Vendor ID. In this example it is “VendorID”. Then in the “Type” column, select Auth Field. This ensures that the fields will be validated for security. Then in the “Value/To Field or Auth Field” column, type in the name of the ID field from the Vendor record type. This tells the system to take the vendor’s ID and put it into the search for the VendorID field in invoices.
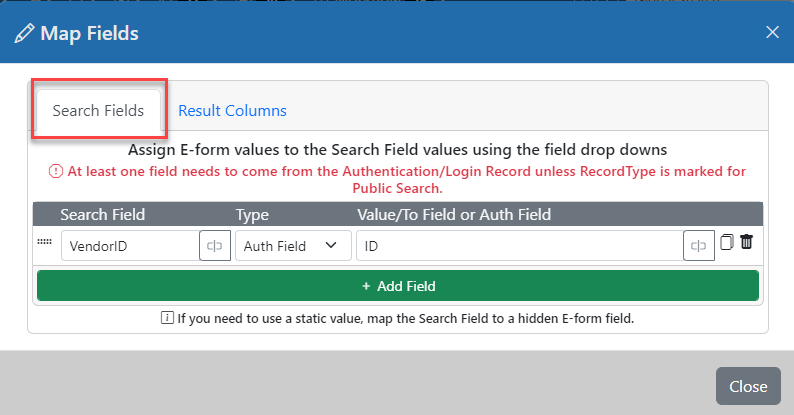
IMPORTANT: In order for searching to work properly, you need to use the AUTH FIELD type for at least one field! This ties the searching to the E-form’s security by relating one or more of the searching fields to the data used for authentication. By doing this, the server knows to how make sure the current user has rights to the proper data.
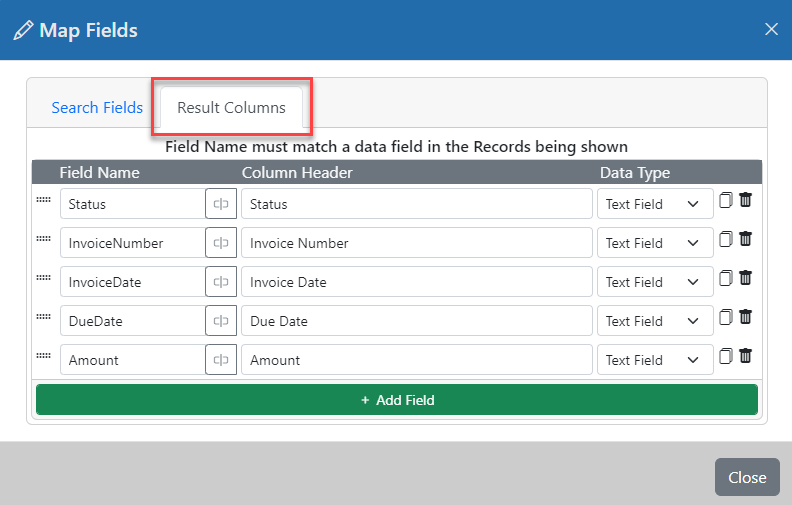
We will add more fields later. For now, let’s move on to the “Result Columns” tab. Add the fields you wish to show as columns in the search results. Setting the field type can be useful for sorting but text works in most cases.
IMPORTANT: In order to allow outside users to search records like this, you need to set up the Record Type correctly. There are 2 options in the Public Settings section of the Record Type that are important for this. You need to turn ON the Collaboration Portals setting in the Record Type and turn OFF the Public Searching option. If the Public Searching option is turned on, then the authenticated search will not work properly!
The last step is to have a way to tell the search field to run its search. That is where the toolbar comes in. Add a new option and set the Type field to “Trigger Search Field” and the Search Field to “Public Search Results”. When the user clicks this option, it will run the search!
Step 4 – Test Searching
In order to test the search, you will need to log into the form as an external user using another browser or a “In Private” browser. That way it has a Vendor ID to use for the search. If you just open and test as a logged in user, you will not find any invoices. Copy the Public URL from the “Where to Show” panel then add on the GUID in your private browser like we did in the last article. Then use that vendor’s password to get into the form.
When you get in, click the “Search” button to run your search. If everything goes well, you should see invoices for the vendor you logged in as.

* If you don’t see results when you think you should, check the Error Logs report in the system. Instead of reporting issues through the browser, we log them so outside users cannot see if problems occur.
Step 5 – Add Search Fields
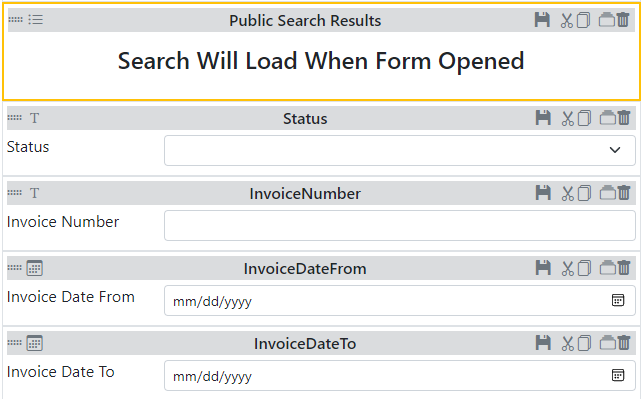
Now that the form is functional, we can add more capabilities such as adding search fields. You can use any field type that makes sense. In our example here, we will allow users to search by Invoice Number with a text field, Status with an option list and Invoice Date with a date range.
Step 6 – Add a Search Button
Let’s add a simple Search button that will trigger the search. Drop a Button field from the “Button / Action Fields” toolbox onto your form.
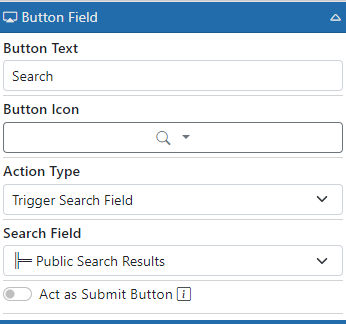
Change its Button Text to “Search” and select an icon to make it look nice. Then in the “Action Type” setting – choose “Trigger Search Field.” Then in the “Search Field” setting, choose the “Public Search Results” field.
Step 7 – Associate Fields with Search
Now we need to associate our new form fields with the search. We do that by adding entries in the “Search Fields” section of the Public Search Results field.
Go to the “Public Search Results” field and click the “Map Fields” button. In the “Search Fields” section, click the “Add Field” button and select a Record Type field from the field selector. Make sure the Type setting is set to “Search Field.” In the “Value/To Field…” selection, select the correct E-form field. The last drop down is used to do range searching for numeric or date values. If you need to do a range search you will need to drop 2 fields into your search form – one for the FROM value and one for the TO value.
Repeat this for each field you defined for searching. When you are done, your search fields should resemble this screen.
Now if you test your form, you should be able to enter search criteria to limit your search.
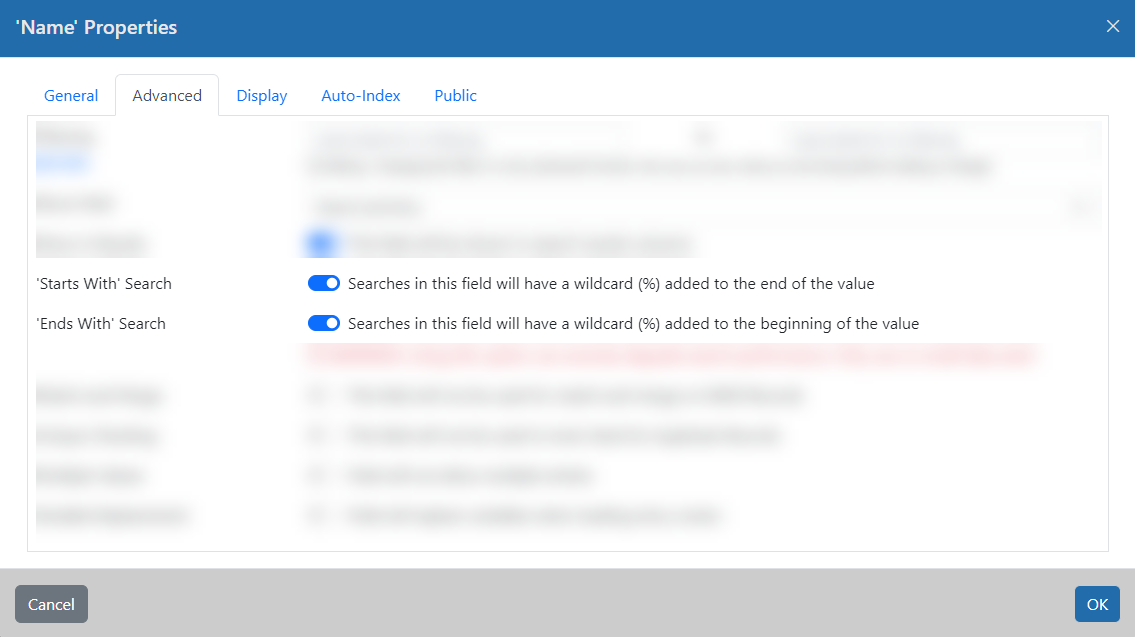
One quick note on searching. By default, text fields are set to “exact” matching which means you would have to type in a person’s full name to find them in our example. That is not very user friendly but there is a fix. In the Record Type settings for that field, go to the Advanced tab and you will see 2 wildcard options. If you turn them BOTH on then you will enable searching on any part of the value. In other words, it turns the search field into a “contains” search. You can also use just the “Starts With” or “Ends With” options. Whichever you decide to use, you should add a label to the E-form that instructs the users on how it works.
Step 8 – Add Document Viewing
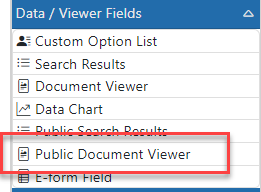
Now that we can search for records, we can work on enabling document viewing. For that we will use the “Public Document Viewer” field from the “Data / Viewer Fields” toolbox.
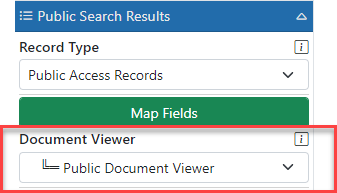
Drop a “Public Document Viewer” field onto your form. For now, place it above the search results. We will move it later. Go back to the “Public Search Results” field and change the “Document Viewer” option to the new “Public Document Viewer” field.
Save and test your form to see how you can now search and click on the result to show documents! You can even tweak the document viewer to only show documents from specific categories if you need.
Step 9 – Pop Up Documents
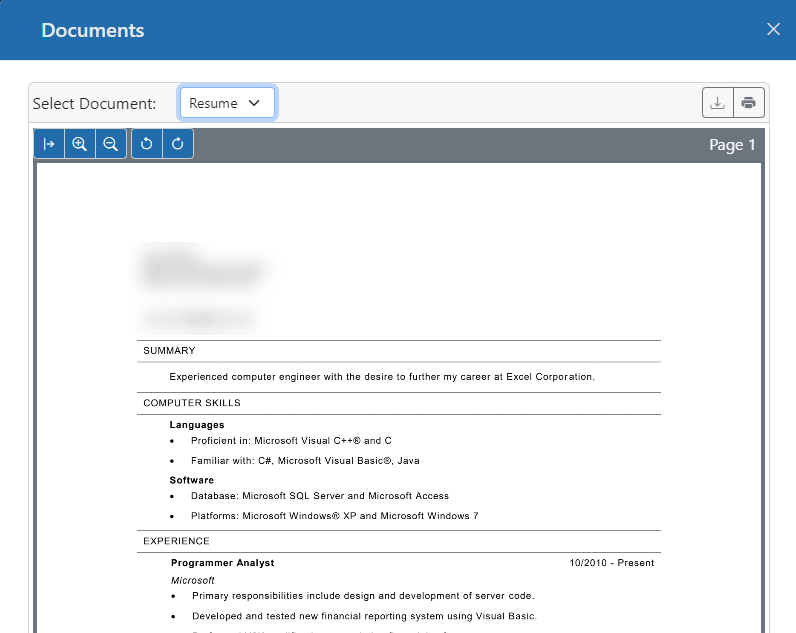
The form works, but it does not feel very intuitive to have the document show up and not be able to get rid of it. A common viewing method for these types of systems is to show the documents in a pop-up window and allow users to close when done viewing.
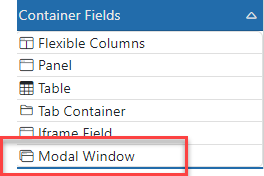
We have a “Modal Window” field that will allow us to do just that. It is in the “Container Fields” toolbox.
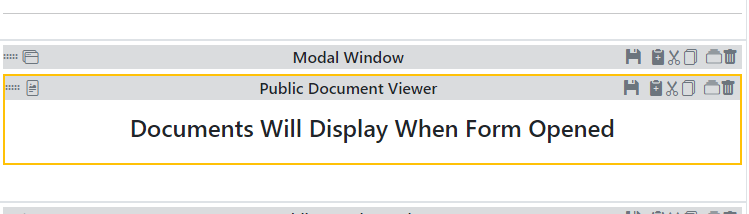
Drop a “Modal Widow” Field onto the form right above your Public Document Viewer field. The Modal field allows you to put field inside of it that will only show when the modal pops up. Let’s drop our Public Document Viewer field into that Modal.
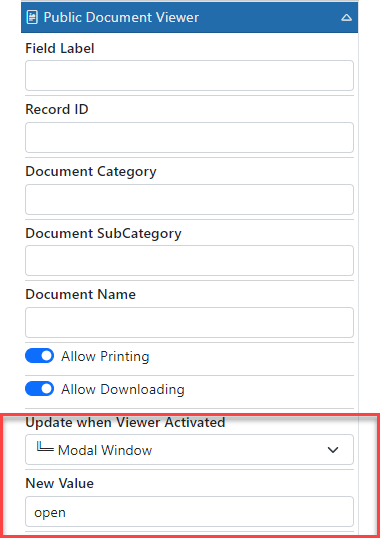
Now all we have to do is tell the Modal to “pop up” when a document is being viewed. The simplest way to do this is to use the “Update when Viewer Activated” setting in the document viewer field.
Click on the document viewer field then set the “Update when Viewer Activated” setting by pointing it to the “Modal Window” field. Then in the “New Value” field you just need to set it to anything to trigger the modal. We typically use the word “open” or just an “x.”
Save and test your form and now you can see your documents pop up when you click on a search result. That is a much better UI design!
You can change the Modal field “Display Settings” to make the pop-up wider or narrower to fit your needs. For this type of search/view UI, I would recommend using Extra Large for the size. Don’t worry about mobile users – the modal will automatically adjust to their screen. You can also set the Modal’s title, icon and more.
Summary
You have successfully performed searching in secure E-forms! We will be adding more articles in the near future so stay tuned!
Related Articles