
DocMgt comes out of the box with built-in QuickBooks Integration to synchronize bills, vendors and account information. Refer to this previous article for more information about what the integration can do.
In this article we will describe how to configure QuickBooks integration in the DocMgt system. Follow these instructions step-by-step to get them talking.
UPDATE Feb 6, 2019: The following video has been created to help with the setup process. This video not only covers the content of this article but also goes into more detail on every facet of the setup.
What You Need
You need to be using the desktop version of QuickBooks for Windows version 2019 or higher for this integration. You can check your version using this article as a guide. You also need to be using DocMgt version 3.24 or higher to ensure best compatibility. The DocMgt cloud systems are already up to the right version so if you are using DocMgt in the cloud then you are ready. If you are using DocMgt on premise (your own server) then verify your version before continuing.
DocMgt Configuration
Follow these steps for the basic DocMgt configuration. More can and should be done via workflow but this will get the basics installed and ready for use.
1) Create a user in DocMgt that will be used to communicate between QB and DocMgt. This user account will be associated with a single QuickBooks company file so if you intend on working with more than one company file you “may” need more than one account. You can use the same account for all company files, but it is best practice to separate them for security and logging purposes.
2) Open the “Extra Settings” panel and find the “QuickBooks File” setting. Enter the full path and filename to the QB file to which this user will have access. This value must be the full path and filename of the QuickBooks company file as it is on the machine where the QuickBooks Web connector runs. This file is a *.QBW file that is usually stored in the “My Documents” area or “Public Document” areas of the computer.

3) After you save the User, you can click the “Download QuickBooks QWC File” button to the right of the to download their *.qwc file. You will need this in a later step.
QuickBooks Configuration
Follow these steps to within QuickBooks and the QuickBooks Web Connector (QBWC). This will enable our new user to communicate with QuickBooks.
1) Start QuickBooks and open the company file you wish to work with. Make sure to log into this file as an administrator.
IMPORTANT! You need to stay logged into QB and this company file throughout the process or until instructed otherwise.
2) Add a new user in QuickBooks that will have sufficient access to the information you are synchronizing with DocMgt. If you already have a user you wish to use for this process then you can use that.
- Click users and click users and roles
- Next to your user, click edit
- Add full access to the role
- Remember this user’s username and password for a later step!

3) Install the QuickBooks Web Connector if it is not already installed. If you are using a newer version of QuickBooks then the QBWC should already be installed. Make sure this machine has access to the QB files with which you need to work.
4) Start the QuickBooks Web Connector program from either the Windows Start menu or by using the “Update Web Services” option from the File menu in QuickBooks.
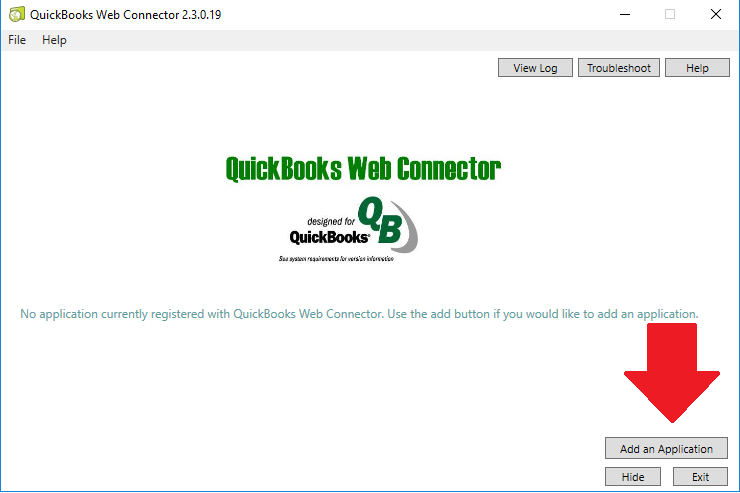
5) Click the “Add an Application” button to add DocMgt to the list. When prompted, select the *.qwc file that you generated in the docMgt section.
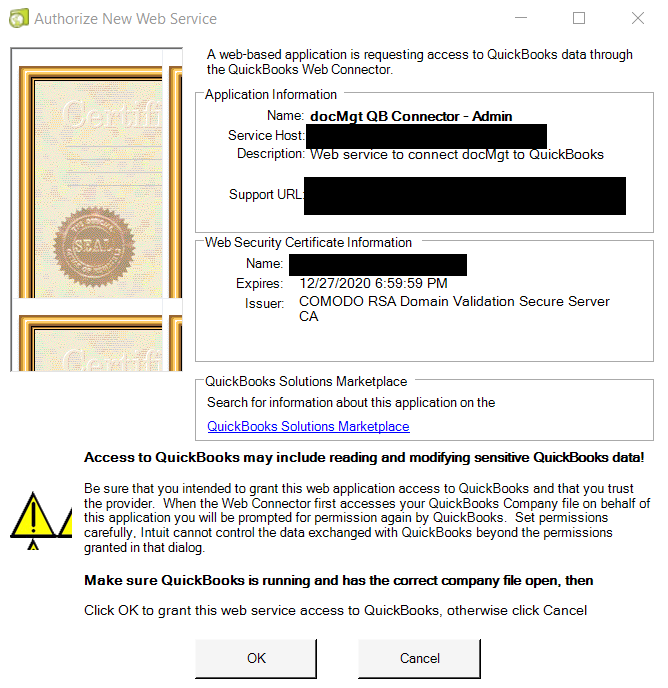
6) In a few moments you will receive the “Authorize New Web Service” screen. Click OK. You may receive what looks to be an error at this point. This is OK – you can continue.
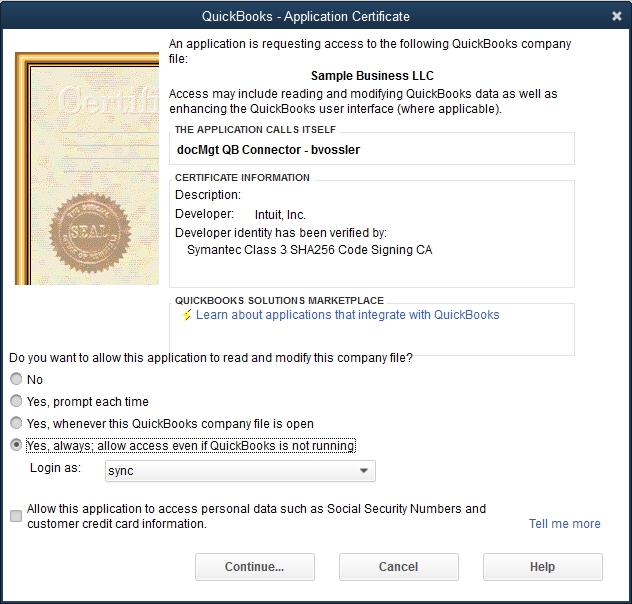
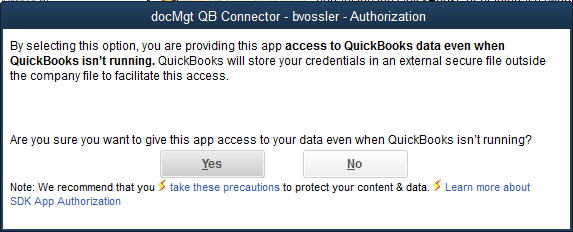
7) Grant access to the application when prompted and set the level to allow access even if QuickBooks is not running. Select the QB user you added in step 3 above. This tells the QuickBooks Web Connector (QBWC) to use that user when processing. Hit continue.
8) In the QuickBooks Web Connector program you will now have an entry for the DocMgt application. Here you need to enter the password for the DocMgt user in the password box. Add the password for the user you set up in step 1 of the DocMgt set up section.
9) As a test, check ON the checkbox for the DocMgt application and then click “Update Selected”. This will trigger a communication from the QuickBooks Web Connector to DocMgt. If there are any problems they will be logged for your review.
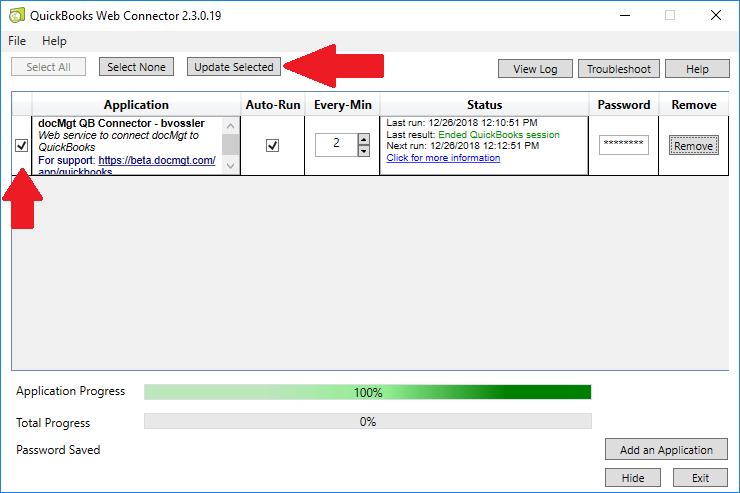
10 ) If you experienced any errors you can review them on this screen or you can click the “View Log” button to open the log file and see what may have happened. The typical errors include:
- Invalid password for the DocMgt user
- Invalid path and filename for the selected QuickBooks company file
- Invalid rights for the QuickBooks user
Once you have successfully run the update then the installation is complete. From this point on the information that is exchanged between QuickBooks and DocMgt are configured in DocMgt workflow.
DocMgt Workflow
Information exchanged between DocMgt and QuickBooks can be split into 2 categories – Data Sync and Bill Save. “Data Sync” refers to synchronizing all the lookup data such as Vendors, Accounts, Classes, etc. from QuickBooks to DocMgt. This data is used in the indexing screens to ensure proper invoice indexing. “Bill Save” refers to sending the invoice (bill) data from DocMgt to QuickBooks so it can be paid properly within QuickBooks. This section will describe how to configure Work Triggers in DocMgt to handle both categories of data exchange.
NOTE: The following workflow configuration is a good start but is for example only. Your needs may be different and the configuration may be different as well. The rules you use to activate these triggers will vary depending on your use case. Please coordinate with your DocMgt support representative to ensure proper workflow setup.
Data Sync
- Add a trigger to the workflow to allow for synchronizing lookup data from QuickBooks.
- Assign the user that we set up for the QuickBooks Web Connector user in step 1 of the DocMgt steps above.
- Go to the “Integration Settings” section of the trigger and expand it.
- Select “QuickBooks COMPLETE Sync (ALL Accounts, Classes and Vendors)” as the Integration Type. You could enter separate triggers for each data type but that is not recommended for normal use.
- Add another trigger to allow for the recurrence of the first trigger.
- Assign the docMgt_Agent user to this step so it does not get processed by anyone else.
- Add a follow-up action to this trigger that takes the processing back to the first trigger we created. The easiest way to do this is to have a button configured as auto-complete and have the follow-up action perform a Complete Workflow action.
- Set the follow-up action’s timer to a cycle that makes sense. This will be updating Vendors, etc. from QB so it is usual that every week you should would run this process. To do this set the “When to follow up” properties to “7 days after Assigned Date.”
Triggering and Assignment Note: The first trigger MUST be assigned to the user that we set up for the QuickBooks Web Connector user in step 1 of the DocMgt steps above. The second is a trigger that will wait for a period of time and then send the work item back to the first trigger using a Follow-Up Action. The second trigger must NOT be assigned to the user that we set up above. This should be assigned to the docMgt_Agent user or some other user that will just be used to trigger the follow-up action.
Bill Save
1) Add a trigger to the workflow to allow for saving a bill (Invoice) into QuickBooks.
2) Go to the “Integration Settings” section of the trigger and expand it.
3) Select “QuickBooks Bill Save” as the Integration Type.
4) You will now see a series of field mappings. These mappings allow you to configure which fields from DocMgt get sent into QuickBooks. The column on the left is the QuickBooks field name. The column in the middle is where you select the field from DocMgt to use for the QB values. The column on the right allows you to use a static value for the data. Which options you choose depend on your exact needs but typically you would only need to work with columns 1 and 2. Column 1 is already set to be the values you need for QuickBooks so in reality only column 2 needs to be changed.
Indexing Note: Remember that QuickBooks does not accept the header value for the amount. It is the sum of all the line items that will make up the header amount so there is no need to map it in the header values.
5) The “Line Item Field Mapping” section allows you to specify which fields from the line items map to the appropriate fields in QuickBooks as well. It is structured just like the Field Mapping section above.
Triggering and Assignment Note: This trigger is usually activated at the end of an approval process. Once the invoice is indexed and approved it will stop at this trigger for processing. This trigger MUST be assigned to the user that we set up for the QuickBooks Web Connector user in step 1 above.
When all this is done you should have a workable QuickBooks integration. The finer points of approvals and rejections can be handled with purely workflow.
Useful QuickBooks Info
Field size limitations in QuickBooks
Acceptable Characters in QuickBooks values
Related Articles
QuickBooks Integration Included with docMgt!