
Forms Are Not Always ‘Simple’
E-forms are a powerful way to collect data. For simple forms, all you need to do is add fields, put in images and labels, and you are ready to bring in all the data you want. But what if you need to do more than just collect data? What if you need to validate the data or look up other information based on the entered data? That is where E-form Automation Events come in!
E-form Automation Events
Starting with version 4.06, DocMgt E-forms support a new feature – E-form Automation Events (“Events” for short). Events allow you “program” a form to do things based on a user’s actions. For instance, if the user clicks a “Validate” button, you can have the form validate data entered in the “PO Number” field. Or when the user leaves the “Invoice Number” field, the form can check the invoice number to see if it exists in the system.
What Events Are Supported
All Text, Multiline Text, Number, Date, Check Box, Radio Button and Option List fields support Events. When you select any of those fields in the E-from Designer, you will have a panel on the right labeled “Automation Settings”. Open that panel to see the 3 events that you can configure.
Focus Event
When the field gets focus, this event will fire. Focus is when the field is the active field and usually has the cursor blinking, ready for data entry.
Blur Event
When the field loses focus, this event will fire. This normally happens when the field has focus and then a user either uses the TAB key to move to the next field or uses the mouse or touch to select a different field. Once that happens the blur event fires.
Change Event
When the value of the field changes, this event will fire. The change can be from the user typing in a value or it can be because of another event that changed this field’s value. For check boxes, the changing from checked to unchecked or vice versa will trigger the change event. One difference with this event is that it can be triggered multiple times while people are entering data manually. For that reason, there is a slight delay before the event fires. After the change has been made, if nothing else changes with it for 1/4 second, the event fires. However, if another change happens before 1/4 second is up then the timer starts over. This helps avoid calling the event too often.
The BLUR event is the most common event, and the CHANGE event is the least common.
Button fields support a single event – the “Click” event. When you select a Button field, one of the Button Types available is “Run Action Set”. This works the same way as the other events listed above.
Click Event
This is for BUTTON fields only. When the user clicks the button, the click event fires, and the selected Action Set will be called.
How to Configure Events
Once you have decided which E-form Automation Events(s) to use, the next step is setting it up properly. Keep in mind that when the event fires, the E-form will gather some data from the form and send it to the server. The server will then use that data inside an Action Set to perform actions and return data. So, there are 2 separate areas to configure to use this properly – the E-form Event and the Action Set. The Action Set needs to be available for the E-form to call it so we usually start with that.
Action Set Configuration
In the Admin area, select Action Sets. Add a new one and name it accordingly. The Action Set will operate in its normal way, except that instead of being called from an Add-In or Workflow, it is run using the data that will be sent into it from the form. We will show you how to send that data in the E-form part. For now, here are some things to keep in mind about the Action set:
- If the E-form is being opened in a Record, then the Record itself will be available to the Action set. Otherwise there will be no Record.
- If the E-form has already been saved as a Document, then that Document will be available to the Action set. Otherwise, there will be no Document.
- The Action Set will run any action just like workflow so you can do a LOT with this
- The Action Set will be able to send data back to the E-form using the “Set Return Data” action. This will allow you to update the E-form with data once the Action Set is done.
What you do inside the Action Set is up to you. The one scenario that will most likely be used is validating data that was entered in the E-form. Here is the minimal set of actions needed to do that:
- Add a “Create Temp Record” action to hold any data that needs to be gathered while processing. This will save you from having to make and save changes to any actual Records which slows down the processing. You don’t need to specify field values here. They will be filled in using the Search and Update action.
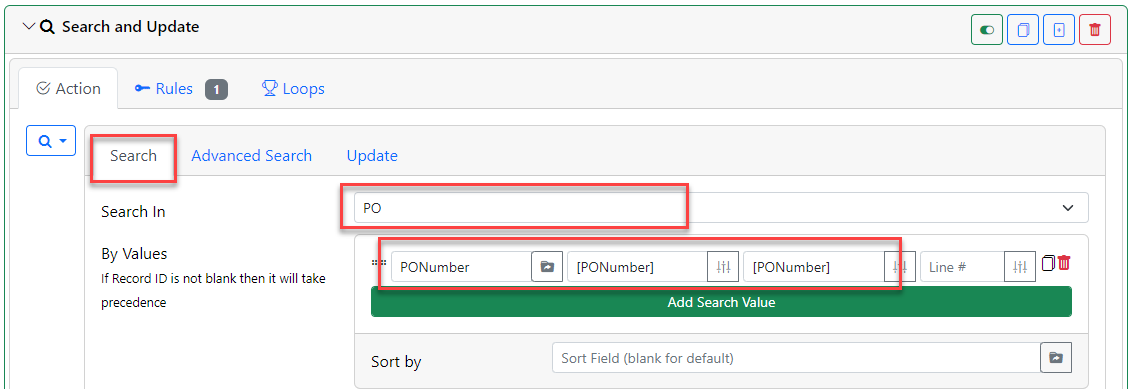
- Add a “Search and Update” to search for the incoming value (i.e. PO Number) in the proper Record Type. Set the Update section to pull the required data from that PO record so it can be returned to the E-form.
- Pull the values you wish to use for updating the E-form in the UPDATE tab. In this example we are pulling the “Amount” and “PNumber” fields. This update will place the data values into the temporary Record for the next step.
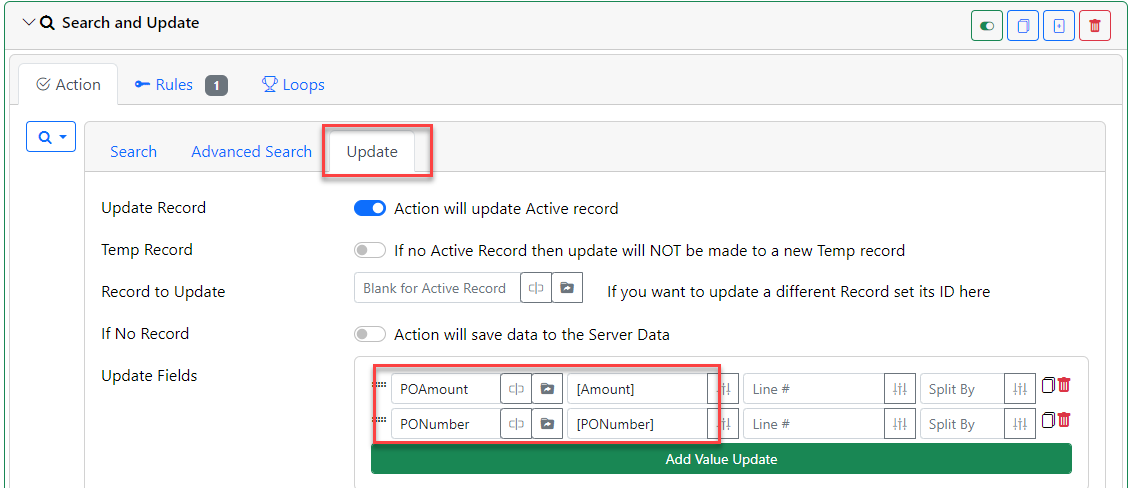
- Add a “Set Return Data” action which allows you to send data back to the E-form with the proper names. It is important to know that the names you give the data here need to match up to the names of the fields in the E-form. When they are returned, the fields with the matching names are updated with the data sent back from this action.

E-form Event Configuration
Once the Action Set is ready, you can configure your field to call it. Select the Action Set from the dropdown for the event you wish to use. Selecting an Action Set will show a new field labeled “Fields to Send”. This field will hold the names of the fields in the E-form whose values you want to send to the Action Set. The Action Set will have these values available to it by name using the normal variable bracket syntax – [FIELDNAME]. For instance, if you want to validate a field named PONumber form the E-form, you would add “PONumber” into the “Fields to Send” field. Add one field name per line if you need to send more than one.
For the example above of validating a PO Number, you would most likely use the BLUR event, and the screen would look something like this.
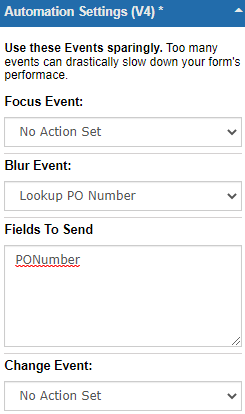
When the user leaves the “PONumber” field, that field’s value is sent to the server with the name “PONumber.” You can use that value with the “[PONumber]” syntax to look for a PO Number match. If it matches, then you can send back the PO’s Amount value in the “Set Return Data” action – formatted or not.
Related Articles