New docMgt Viewer
We are pleased to announce the release of our new docMgt viewer! This new viewer is found in the Documents panel of the Record screen. There are several enhancements to talk about today including the ability to color code the heading names and drag and drop ordering of documents to name a couple.

Document Category Functionality
After opening the Documents panel by selecting the drop down, you’ll see all documents that belong to this record, separated by their Category. The number to the right of the category signifies how many documents reside in the Category. On the right side of the Category panel you’ll see three additional options.
![]() Scan Documents – use this option when scanning documents to the selected Category.
Scan Documents – use this option when scanning documents to the selected Category.
[icon name=”upload” class=”” unprefixed_class=””] Upload New Document – use this option when scanning documents to the selected Category.
[icon name=”pencil-square-o” class=”” unprefixed_class=””] Edit Category – use this option to rename the selected Category.

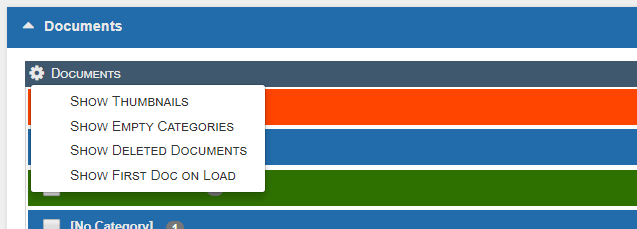
By selecting the ![]() icon under the Documents panel, you’re given several custom options. These options include:
icon under the Documents panel, you’re given several custom options. These options include:
- Show Thumbnails – This option allows you to view the thumbnail of the first page of the document within the list.
- Show Empty Categories – With this option OFF you only see the categories that have documents within them. If you turn this ON then you will also see any categories defined in the record type but have no documents in the current record.
- Show Deleted Documents – With this option ON, documents that have been deleted but not purged are shown.
- Show First Doc on Load – With this option ON, the first Document in the first Category is open upon load. When OFF, no documents are opened.

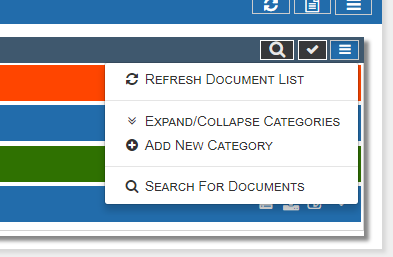
Special actions are available under the Documents panel by selecting the [icon name=”bars” class=”” unprefixed_class=””] icon on the right. In this menu you have the following options:
- Refresh Document List – Re-loads the documents list from the server.
- Expand/Collapse Categories – When you click on a category header that category opens to show all the documents inside. This option will open them all or close them all.
- Add New Category – This will add a new category header to the category list so you can upload or scan documents into it.
- Search For Documents – This allows you to search for documents in the current record which contain the word(s) you enter. This searches the OCR data so you must have OCR available to use this.

By selecting the Category panel drop-down, all Documents in the Category are presented. Document Name, Creation Date of the Document, Date of last alteration and the User who made the alteration. To open the Document, simply click on the Document Name. The File Type (Document Extension) can be found to the right.
By selecting the [icon name=”download” class=”” unprefixed_class=””] icon, the Document will be downloaded with options to download the original Document or the Document in PDF with or without Annotations.
If there are multiple pages in the Document that you wish to split into their own Documents, select the [icon name=”object-ungroup” class=”” unprefixed_class=””] icon.
To edit the Document’s Properties, select the [icon name=”pencil-square-o” class=”” unprefixed_class=””] option. This will bring up a document edit dialog that not only allows for editing the Category and Name but also gives you other information such as upload date and user and a direct link to the document.

It is very easy to organize documents in your desired order. Simply drag or drop a document to the new desired location and Press Save Changes. Want to reorganize several documents at once? Not a problem! Simply check on the checkbox to the left of the Document Names and drag and drop. When you do this all the checked documents are moved to the location where you dropped them. Don’t forget to press Save Changes!
Document Viewing Functionality

Finally, let’s review the options that are now available when a Document is opened.
[icon name=”eye” class=”” unprefixed_class=””] = View Document Text. This shows you the OCR data that was read from the document. Hover over any word in the list and it will be highlighted in the document. Click the word and it will stay highlighted until you click it again.
[icon name=”book” class=”” unprefixed_class=””] = View Document Notes. Documents can have notes just like records. You can view these notes by clicking the View Document Notes button. You can also add your own notes while there.
[icon name=”history” class=”” unprefixed_class=””] = View Document Revisions. If the document has been re-saved after it as originally uploaded then it will have a revision. All revisions are located in this area. You can view the dates and times as well as the user who made them. You can ever restore an old revision as the current document.
[icon name=”print” class=”” unprefixed_class=””] = Print Document – Click this to convert the current document to a PDF for easy printing.
[icon name=”download” class=”” unprefixed_class=””] = Download Document. Click here to download the document easily.
[icon name=”envelope-o” class=”” unprefixed_class=””] = Email Document. This brings up an email dialog that allows you email the document to someone right from your browser.
[icon name=”share-square-o” class=”” unprefixed_class=””] = Add Document to Process Queue. If you wish to Print, Download or Email multiple documents you can add them the Processing Queue.
[icon name=”file-pdf-o” class=”” unprefixed_class=””] = Convert to PDF. This option will actually convert the current document to a PDF. It will also burn in all annotations and make them a permanent part of the document.
[icon name=”repeat” class=”” unprefixed_class=””] = Replace Document. Use this to browse your computer for a document to replace the current one.
[icon name=”object-ungroup” class=”” unprefixed_class=””] = Split Document. Split a multi-page document into several one-page documents.
[icon name=”pencil-square-o” class=”” unprefixed_class=””] = Edit Document. Edit the document Category and Name. This screen also gives you more information about the document.
[icon name=”trash” class=”” unprefixed_class=””] = Delete Document. Use this if you wish to delete the document. The document will remain the record as deleted and will only be shown if you use the Show Deleted Documents option.
Summary
There you have it! As you’ve seen the New Viewer gives you several options from the Document level. Stay tuned for future articles surrounding docMgt’s New Viewer!
