
How to Install and Configure docMgt OCR Engine
docMgt has an optional OCR Engine that can run Optical Character Recognition on the document stored inside docMgt. This process creates the indexed text that enables full-text searching and click indexing within the docMgt infrastructure. If you have an in-house installation of docMgt Server you may wish to take advantage of this capability. This article will explain how to install and how to configure docMgt OCR for proper use.
Please note that if you are using the Cloud version of docMgt Server you will NOT need to install or configure the docMgt OCR Engine. You do not need to read this article.
Installing the OCR Engine
The first thing you need to do is to get the OCR Engine installed. Although the OCR Engine is part of the docMgt Server installer, it should be installed on a machine OTHER THAN the server when installing in production. The OCR process can take quite a bit of CPU power and if, if you run it on the same computer, that will take performance away from the docMgt server’s ability to process requests.
Run the docMgt Server installer and when asked for the features to install, turn OFF all options except Databases and docMgt OCR Service.
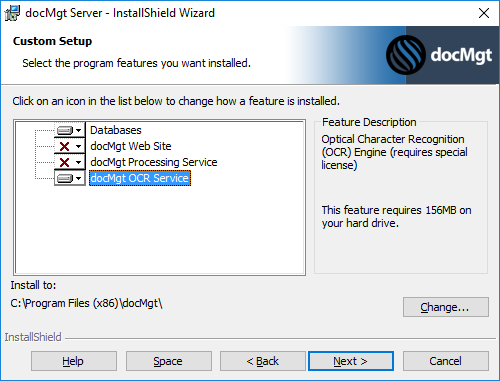
Databases must be selected because the OCR service needs to have a direct connection to the docMgt Server’s database in order to function. The installer will not only validate the database is configured properly but will also point the OCR engine to that database for its operation.
Finish the installer as normal. When you are done you can continue to the next section.
OCR Agent vs OCR Monitor
During the installation process all the files required for the OCR Engine are placed into 2 main folders. These are C:\Program Files\docMgt\OCR\OCRAgent and C:\Program Files\docMgt\OCR\OCRMonitor. The former actually performs the OCR process. The latter monitors the OCR queue for work to be done. The only one you need to worry about configuring is the OCR Monitor so that is what we will cover in this section.
The only things you should need to change in the OCR Monitor configuration are the location of the OCR Agent, the database connection string and scheduling the OCR Monitor to check the OCR queue.
Location of OCR Agent
There are times when you need to tell the OCR Monitor where the OCR Agent resides. This can happen when you manually move the OCR Agent. To do this, open the docMgt.OCRMonitor.exe.config file located in the C:\Program Files\docMgt\OCR\OCRMonitor folder using a text editor such as Notepad. Locate the configuration/appSettings/OCRApp key. Change the value property to the full path and file name of the OCR Agent program.
<appSettings>
  <add key="OCRApp" value="C:\Program Files (x86)\docMgt\OCR\OCRAgent\docMgt.OCR.exe" />
</appSettings>
Database Connection
If you change the database that serves docMgt you will need to update the Connection String in the OCR Monitor program. To do this, open the docMgt.OCRMonitor.exe.config file located in the C:\Program Files\docMgt\OCR\OCRMonitor folder using a text editor such as Notepad. Locate the configuration/connectionStrings/docMgt key. Change the connectionString property to the full SQL connection string.
<connectionStrings>
<add name=”docMgt” providerName=”System.Data.SQLClient” connectionString=”server=(local);database=docMgt;uid=#####;pwd=#####;” />
</connectionStrings>
Scheduling OCR Monitor
The OCR Monitor’s schedule is driven by the Windows Task Scheduler system. When the OCR Monitor is installed a scheduled task is created that runs once a day. It is typically a good idea to change this schedule to run more frequently if you are driving a data-driven process like AP Processing.
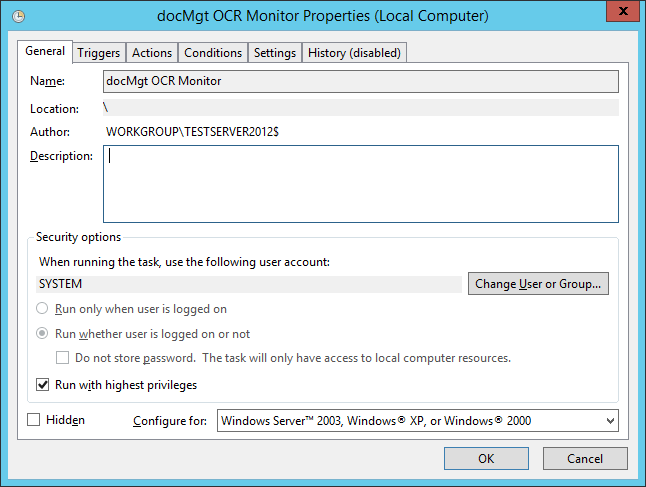
To change the schedule you will need to open Windows Task Scheduler. You can open it from the Administrator tools or you can type taskschd.msc in the Windows Run dialog and hit Enter to open it.
Look for the docMgt OCR Monitor task and double click the docMgt OCR Monitor task to edit it. Here you can change all the properties to auto-run the OCR such as whether or not to run when logged in, which account to use to auto-login (if needed) and the scheduling itself.
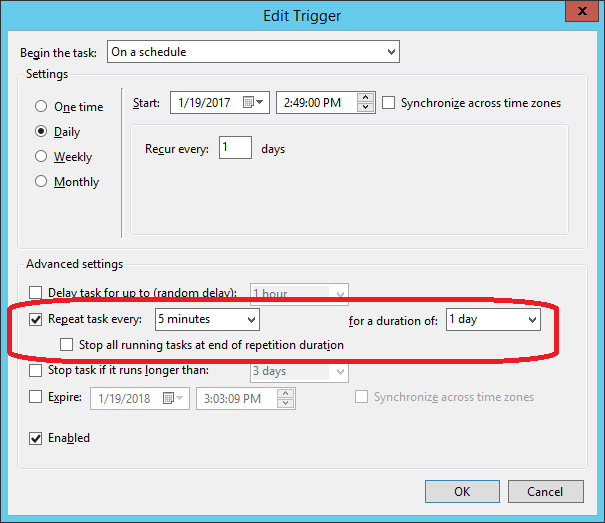
In the “Triggers” screen you can change the timing of the OCR Monitor.

Click the entry and then the Edit button. In the screen that pops up (below) set the task to run every 5 minutes or 15 minutes or whenever you wish by checking ON the “Repeat task every:” check box then selecting or typing in how often to run.
For more information on using and managing of the Scheduled Task please either of these external articles (the linked articles are not managed or endorsed by docMgt):
[icon name=”external-link” class=”” unprefixed_class=””] http://www.digitalcitizen.life/how-create-task-basic-task-wizard?page=1
[icon name=”external-link” class=”” unprefixed_class=””] http://www.howtogeek.com/123393/how-to-automatically-run-programs-and-set-reminders-with-the-windows-task-scheduler/
[icon name=”exclamation-circle” class=”” unprefixed_class=””] One important note is that the OCR process will NOT run unattended (i.e. as a Scheduled Task) until you have licensed it. For information on licensing please refer to this article: Licensing docMgt Products.
Summary
Once you have the OCR process in place it is a fairly hands-off system. It just runs away in the background creating text from images, PDFs and Word documents. The only time you may need to refer back to these directions is if you move your server or database.