
Importer Service Tips and Tricks
Importer Service is a great tool for bringing data and documents into docMgt automatically. It is a very powerful and can do a lot. However, some situations require features that need better explanation in order to wield that power properly. Here are the situations we cover in this article.
- To OCR or Not to OCR
- Mapping Data from a CSV Import
- Importing Multiple Documents into One Record
- Match and Merge
- Manually Adding a Value to Imported Records
1) To OCR or Not to OCR
There is a setting in Importer that allows you to tell the server to OCR the documents that are uploaded. You might think that checking it ON would tell the server to OCR and checking it OFF would tell the server to NOT OCR. However, that is not quite right. And to complicate matters a little, the functionality has changed since version 3.10.
If you are using version 3.10 or later and you check ON the OCR flag then that does, in fact, tell the server to perform OCR. If you do NOT check on the OCR flag then it is really telling the server to decide whether or not to do the OCR. There is a setting in the Record Type options that tells the server to OCR documents in this Record Type. If that is turned ON then no matter what you tell the Importer – the server will OCR the documents. However, if the setting is OFF in the Record Type then you can still tell the server to OCR documents via Importer by turning ON the OCR setting in the Importer config.
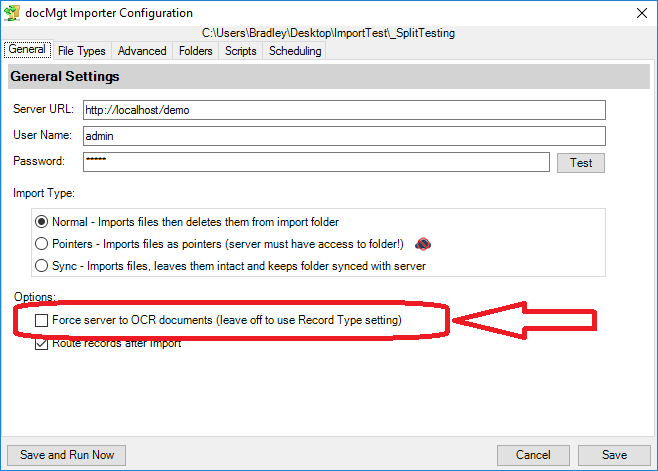
If you are using version 3.09 or earlier and you check ON the OCR flag then that tells the server to perform OCR. If you do NOT check on the OCR flag then it is telling the server to NOT OCR the documents. Even if the Record Type settings are configured to OCR all documents the documents will not have OCR performed.
The change from version 3.09 to 3.10 was done to make the Record Type setting more in control than the Importer. This way you can have better central management of the OCR process.
2) Mapping Data from a CSV Import
Mapping data from a CSV (comma-separated values [icon name=”external-link” class=”” unprefixed_class=””]) file into docMgt is something most people overthink. There is no column mapping or data translation that occurs. Simply put – the CSV must hold all the information you want to import. That means the header of the CSV must be the field name that you want the data in that column to be saved as.
Let’s take an example where the CSV file is laid out like this:
Name,Address,City,State
John Smith,123 Main Street,Anytown,CA
John Doe, 800 Apple Street,Nowhere,OK
Adam West,1 Bat Cave Rd,Gotham,XX
When you import this file into docMgt you will create 3 records. Each record will have a Name field, an Address field, a City field and a State field *. If you want the first column to be named FullName when it imports into docMgt you need to change your CSV header to match. There is no re-naming that occurs **.
3) Importing Multiple Documents into one Record
A very common scenario for importing data is to import one Record with multiple documents. It doesn’t always seem obvious that it can be done. However, there are actually 2 ways you can approach this with Importer.
Multiple Lines with Matching Record Data
If you have multiple lines in a CSV where the data is the same but the document pointer is different then you can achieve your goal. Only one record will be created and all the documents will be placed into that record. The key to this is that ALL lines for that record must be contiguous. That means they must all be next to each other. Here is an example:
Name,Address,City,State,Document
John Smith,123 Main Street,Anytown,CA,c:\docs\123.pdf
John Smith,123 Main Street,Anytown,CA,c:\docs\124.pdf
John Smith,123 Main Street,Anytown,CA ,c:\docs\125.pdf
In the above case one record will be created with 3 documents.
Name,Address,City,State,Document
John Smith,123 Main Street,Anytown,CA,c:\docs\123.pdf
Adam West,1 Bat Cave,Gotham,NY,c:\docs\124.pdf
John Smith,123 Main Street,Anytown,CA ,c:\docs\125.pdf
However, in this second case you will get 3 records because the matching records for John Smith are not next to each other. If you have this scenario but STILL want the records to merge, then use the Match columns feature in Importer to match on name and address so the records will merge.
One Line with Multiple Documents
You can also have a single line in the CSV that contains multiple document pointers. The importer naturally inspects each column of data and if the column contains a pointer to an existing file then that file will be imported. Here is an example:
Name,Address,City,State,Document
John Smith,123 Main Street,Anytown,CA,c:\docs\123.pdf,c:\docs\124.pdf c:\docs\125.pdf
In this case one record will be created with 3 documents.
4) Match and Merge
Match and Merge is a term used for matching incoming data with existing Records. If you have data coming in that is intended to update existing Records with new values then you can leverage the Match and Merge functionality. The only thing different from a normal import is that you need to tell Importer which fields to use for the matching. You do this by adding the match fields into the Match Field entry box in the Advanced tab. Add one field name per line to the entry box.
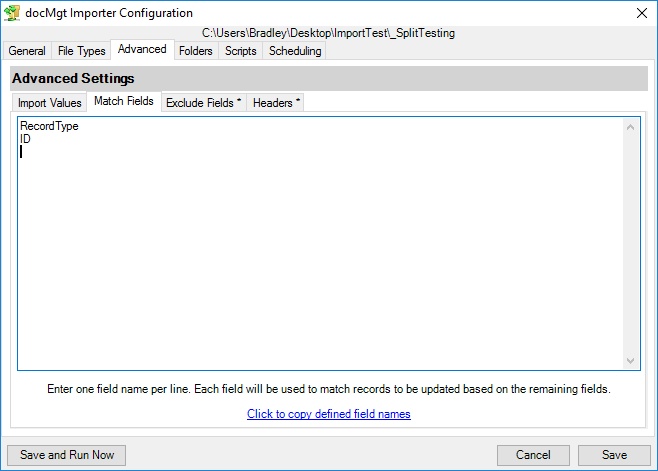
When importing Records, Importer will do a search in docMgt to see if any Records match the values in the fields specified. If there is a match then the values are added and updated in the Record as needed. If there is not a matching Record then a new Record is added with the information provided.
5) Manually Adding Value to Imported Records
Normally when you get a CSV from another system it will have the normal index values included – Name, Address, etc.. But it will most likely NOT have the control variables you need to properly assign a Record Type to the new Records. The typical Record Type assignment logic is to use a variable named RECORDTYPE with a value that matches to your Record Type (i.e. AP for an Accounts Payable Record Type). If this value is not present in the CSV you can manually add it in the Advanced tab in Importer. Just add a new entry to the Import Values grid with your value. Every Record that gets imported using this configuration will have that added data value assigned to it.
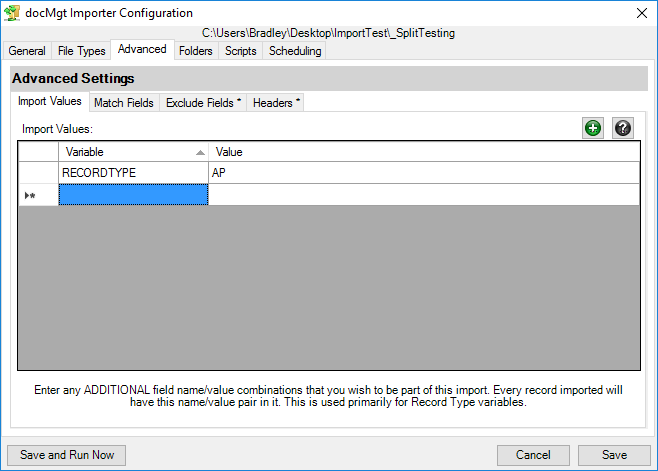
You can also use this feature to add other control variables such as import date, folder location, static values and more.
Notes
* You can tell the Importer Service to skip columns in a CSV import using the “Advanced / Exclude Fields” option.
** Keep in mind that this article discusses the standard way that Importer works. Most of these features can be changed using an Importer Add-In. If you feel you need an add-in to override the default behavior let us know and we will help you out.