

Document Merge Templates
Word and PDF documents are great tools for creating nicely-formatted documents. There are times when you want to present information from DocMgt in one of those nicely-formatted documents. Sometimes manually and other times as part of a workflow. This is where Document Merge Templates come in.
One example is a certificate of completion. In this case a user might get a PDF of a certificate emailed to them once they completed their training. Another example is a welcome letter. Here a letter welcoming a new employee could be generated and emailed to them. One manual example would be a printable envelope. Whenever you needed to print an envelope from a record you could manually merge an envelope template.
Merge Document Options
Document merging is simply described as merging content from DocMgt into pre-formatted documents. These documents can be Word (*.DOCX), Adobe (*.PDF) or Excel (*.XLXS). The concepts for dealing with each are similar but the techniques a slightly different. We will explain each in this article. Each document type you make “merge-able” is considered a template. We will explain how to create each template type and how to make them available for users in DocMgt.
Before We Begin
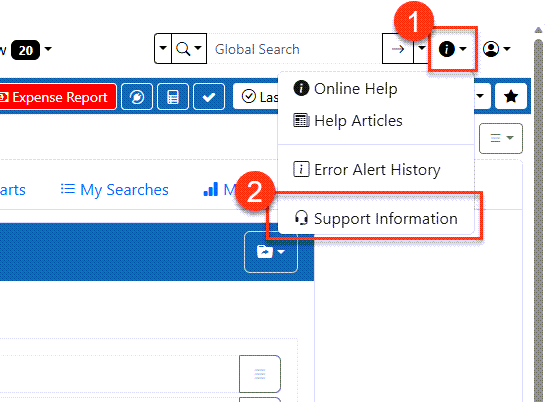
To get started you need to install the DocMgt Windows Add-Ins from your DocMgt site. Log into your site and click the “Help” button on the top right of the toolbar and select “Support Information.”
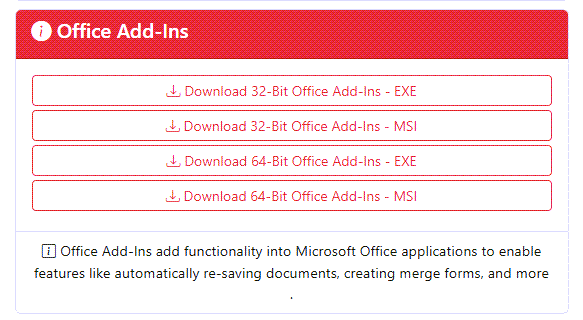
From there click the Office Add-In button that matches your Office installation – 32-bit or 64-bit. The EXE versions of the installers are best for manual installation.
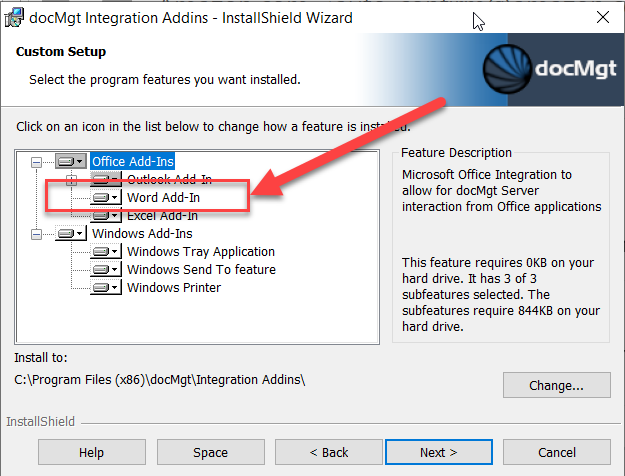
Once downloaded, run the installer and make sure “Word Add-In” is selected. Finish the installation then follow the next steps.
Word Templates
Word documents are the primary template type. They are the easiest to set up and are usually the go-to type. They are the primary type because not only are they easy to deal with but they can be converted to PDF during the merge process. So, whether you want DOCX or PDF output you can start with Word. Also, since the Add-In we will be using for all template types is implemented in Word, we have everything we need in one place.
Starting a New Template
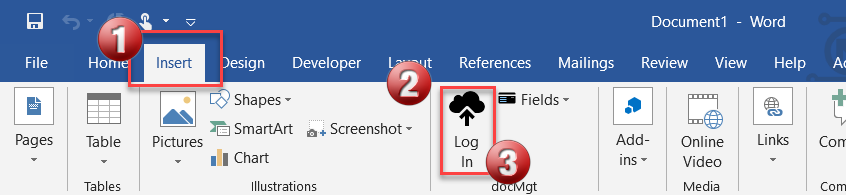
Start Word and open a blank document. Then navigate to the “Insert” tab on the ribbon. There you will find the DocMgt group of controls. Use the “Log In” command to log into your DocMgt site from Word. Once you are logged in some other controls will appear in the DocMgt group.
The first thing you will want to do is create a “Library” that corresponds to the record type you are working with. Creating a Library gives you a way to associate several merge templates with your record type. This tells DocMgt when to make these templates available to users. For instance, if you added a library for your Personnel record type then users viewing a Personnel record will see the available templates. Click the “Select Library” button, click “Add New Library” then select your record type from the list. You can type in your own but it is best to use the list. You can change to another library using the same “Select Library” button.
Once you have selected or created your library you will see 3 options available – “Fields”, “Snippets”, and “Templates”. Fields allow you to place field markers into the document that will be replaced with data when they are used. Snippets allow you to build paragraphs that can be placed into your templates (we will talk about these in a future article). Templates are the list of merge templates available.
For this example, we are creating a new merge template so in your blank document add some text. Let’s use the Personnel example and create a welcome letter. It can be a very basic “welcome to the company” type letter. Add a header and some introduction text. In the body make sure to refer to their position and hire date. We will merge those in later. When you have a little bit of that text you can stop there. From the Insert / DocMgt group click Templates and select “Create New Template from This Document”. In the dialog that appears enter values for the Category, SubCategory (if desired) and Name. These values will be used to tell DocMgt how to store the generated documents in your Records at merge time. Once you click OK the template is now available for your users.
Log in to your site using your browser and go to a Personnel record. Click on the E-forms button to see the forms available for this type of record. The first tab is the list of E-forms, and the second tab is the list of Merge Forms. In the Merge Forms list, you should see your template. Click that and it will merge the document into your record with the record’s data. If you wish the system to save the document as a PDF just click the “Convert to PDF” checkbox before you click the template.
That is it! You should now have a new Word (or PDF) document in your record that was based on your merge template.
Merging Data into Templates using Merge Fields
Now that you have a template built, it is time to put some dynamic data into it. Use the “Insert” toolbar under “DocMgt” in Word to select your Library if you have not. Then you can place your cursor in your Word document at the place you wish to add dynamic data. Once you have your cursor set, click the Fields dropdown in the Insert / DocMgt toolbar and select the data field you wish to place. That will insert a Merge Field into the document that will be replaced with the Record Data when merged.
You can add as many fields as you like this way. If you have a Record field that is not defined, you can use the “Insert Custom Field” in the Fields dropdown list. You will be promoted for the field name. Type in the field name and click OK to place a field into the document that will use your custom field’s data.
Save your template and test again like you did on your first test. If there is data in that Record’s field with the same name as the Merge Field, that data will be placed into the Word document when it is created.
IMPORTANT: The name of the Marge Field must match the name of the data field in DocMgt to find the correct data. Alternatively, you can use variables in the Merge Field name and DocMgt will use variable replacement and place the result into the Merge Field. So, you could use “[DATE] – [USERNAME]” and the field will end up having today’s date and the current user’s login name in that field. Check your online documentation for a list of available variables.
Changing an Existing Template
If you wish to change your template, go through the same process to start Word, go to the Insert tab, Log In (if not already logged in) and select your Library. When you have your library selected, click the Templates button and select the template you wish to edit. Simply make the changes needed and click the save button in Word. The system will file the new version away for you automatically by replacing the old one.
Download the Word Templates Used in Article
Merging Images in Word
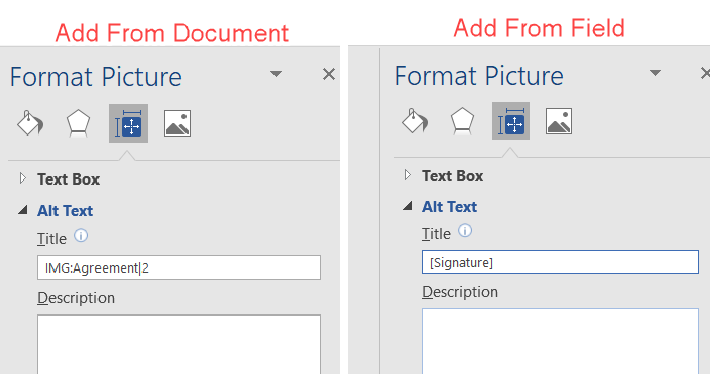
Merging images into a document requires that you first insert a blank or temporary image in the place where you want your merged image to go. This allows you to size and place the image exactly where you want the merged version to go. Right-click on the picture and select Format Picture option. From the Format Picture dialog select “Layout & Properties” (the 3rd icon). Expand the “Alt Text” section and use the “Title” property to do the following.
To merge an image of a document from the record
In the Title property, use the format “IMG:Name|PageNumber|Annotations|PreserveSize|Category|SubCategory|Clarity” to pull an image from the record. The image will be a rendering of the selected document. For instance, if the image you select is from a Word document then a picture of that word document’s page will be put into your merge document.
- Name = The name of the document to merge into the PDF
- PageNumber = The page of the document to use. Defaults to 1 if left empty.
- Annotations = Boolean that specifies whether or not to use the Annotations in the image. Defaults to True if left empty.
PreserveSize = True = sizes the image to the same size as picture rectangle (width AND height). False = sizes the image to fit inside the picture rectangle (width OR height). Defaults to True if left empty. - Category = The name of the category to find the document to merge into the PDF
- SubCategory = The name of the subcategory to find the document to merge into the PDF
- Clarity – Numeric value of 1 to 10 where 1 is least clarity and 10 is most. The default value is 3. There is a tradeoff with clarity where the higher the number, the slower the merge and the larger the resulting merge document. (Added in version 4.36)
As an example, if you want to put an image of page 2 from the document in the “Checks” category and “2020-07-01” SubCategory with the name “Latest” then you would use this string:
IMG:Latest|2|False|False|Checks|2020-07-01
As of version 3.38 we have added the following syntax for document merging. IMAGE:Cat|SubCat|Name|Page|Annotations|PreserveSize|Clarity. For instance, to embed page 3 of the document that is in the Invoice category you could use this: IMAGE:Invoice|||3. To embed page 1 of the document in the Invoice category with the name of ACME and to NOT include annotations – IMAGE:Invoice||ACME|1|false.
To merge a signature from the record data
You can also use record data to merge an image. In order to do this you must have properly -formatted image data saved into the Record. This is common for signatures where you save an E-form’s signature field to the Record. The image data will start with text something like “data:image/png;base64,“. This represents a base64-encoded image that is stored as a string and we can use it to place the image into the merge document.
In the Word image’s Title property, use the name of the field in brackets to merge that field’s data into the image. It will look something like this:
[Signature]
To merge a Web image
Starting with version 4.22, we have the following syntax for merging images from and Internet resource: URL:https://imageurlhere.
For example, URL:https://docmgt.com/wp-content/uploads/2022/05/HorizontalDocMgtBlueBlack-e1654008737801.png will add the DocMgt logo from our site into you your merge document.
*NOTE Some versions of Word do not support the TITLE property above. If you do not see this field then you can use the Description field instead. Title is preferable but if title is blank then we will check the Description field.
CheckBox Support in Word
In order to check ON or OFF a checkbox in Word, you must be sure it is a proper checkbox. The merge supports the Legacy checkboxes from the Developer / Controls control box. The Bookmark property of the checkbox will be used to match to the data. Make sure the bookmark name matches a field name so the value of that field is pulled in to set the checkbox.
Starting with version 3.41 you can also extend checkboxes with variable logic using the checkbox’s Help text. Click the “Add Help Text” button for the checkbox, select “Type your own”, and enter your complete variable in the text box. This value will be used instead of the bookmark if it is available. A good example of variable use is if you want to check the box if the Name field is blank. You would enter something like [IF([Name]|=||Yes|No)].
Any value that equals “YES”, “Y”, “TRUE”, “T”, “1”, “ON”, or “CHECKED” will turn ON the checkbox. Any other value will turn it OFF. IMPORTANT: If you do not have a matching data value then the checkbox is not set either way and will retain its default setting. For this reason you need to be sure that the document template is saved with all checkboxes set to their default.
NOTE: Checkbox support was added in version 3.38.
Multi-Option Field Support in Word
Multi-Option fields in DocMgt store their data in much the same way as other fields except if more than one option is selected the field name is added more than once in the Record along with its corresponding value. For example, imaging a Multi-Option field named DEPT has 3 possible options – A, B and C. If the user saves the record with A and C selected, then the Record will have 2 DEPT fields in it – “DEPT = A” and “DEPT = C”. If you just use [DEPT] in your merge template, then the merge will just find the first one – probably “A”. So, how do you know if DEPT has a C value?
We suggest using the HASVALUE variable to see if DEPT=C exists. You call it like this:
[HASVALUE(Dept|C|yes|no)]
If the Record has a DEPT field with the value C then “yes” will return, else “no” will return. If you need to check on a checkbox, then you can use this as specified above directly in the checkbox Help text field. If DEPT has a C value then the checkbox will be checked ON and if not it will be OFF.
Table Support in Word
There are 2 types of tables you can embed – Line Item tables and E-form tables. Each are similar but have slightly different uses.
Line Item Tables
In order to embed a Line Item table you need to add a table in Word as normal. Add a header if you like. Then in one row you add placeholders for the data elements. You need to specify the line item variable syntax for each column. Then when the merge happens a row is added for each line item and the proper values are placed into the rows from the line items. Here is a sample Line Item table that has 4 fields – UnitPrice, Amount, Description, and GLCode. Notice the [LI()] syntax but more importantly notice that instead of using the line number you use a # sign. This will be replaced with the line numbers during the merge.

TIP: The easy way to add the fields to the table is to use the Fields tool in the DocMgt Word Add-In. The list of available line item fields is shown with LI: on the front of the name. This will insert the line item field into the proper column with the proper formatting.
E-form Tables
In order to embed an E-form table you need to add a table in Word similar to Line Item tables. However, there are a couple more steps. For the table to know which E-form table to pull data from, you need to give it the name. Do this by right-clicking the table and selecting Table Properties. In the Alt Text tab set the Description to the name of the E-form table. Also, you need to remember that the E-form table needs to be set to “Save to Record” in order for the data to be available. This links the Word table with the E-form table.
Then in one row you add placeholders for the data elements like you did for Line Item tables. You need to specify the Table Field Variable syntax for each column. Then when the merge happens a row is added for each line of the E-form table and the proper values are placed into the rows. Here is a sample E-form table that has 4 fields – Item Number, Description, Qty and Amount. Notice the [TABLE()] syntax but more importantly notice that instead of using the line number you use a # sign. This will be replaced with the line numbers during the merge.

TIP: The easy way to add the E-form table fields to the table is to use the Fields tool in the DocMgt Word Add-In. The “Insert Custom E-form Table Field” will prompt you for the table and column names and will insert the field into the proper column with the proper formatting.
NOTE: E-form table support was added in version 3.38.
Search Results Tables
There are times when you need to include a report of related Records in a Word merge. In order to pull this off you can use any variable command that returns multiple Records in JSON format – such as the DMGET and DMGET2 variables. Put the variable into the table’s Description field like you did for the E-form Tables. Right-click on the table and select Table Properties. In the Alt Text tab set the Description to the variable you need. For instance, you could use [DMGET2(2|10|BatchID=100)] to return the first 10 records from Record Type #2 where BatchID = 100. Refer to the DMGET2 documentation for more options.
Right-click the table and select “Table Properties”.
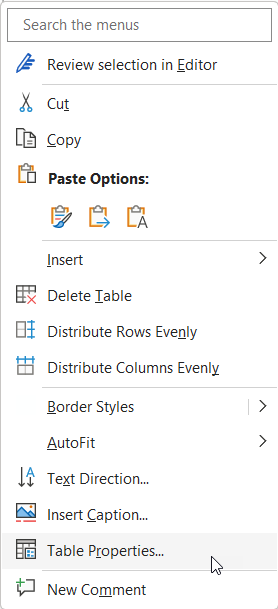
This brings up the Table Properties window. From here, go to the “Alt Text” tab and enter your variable into the “Description” field.
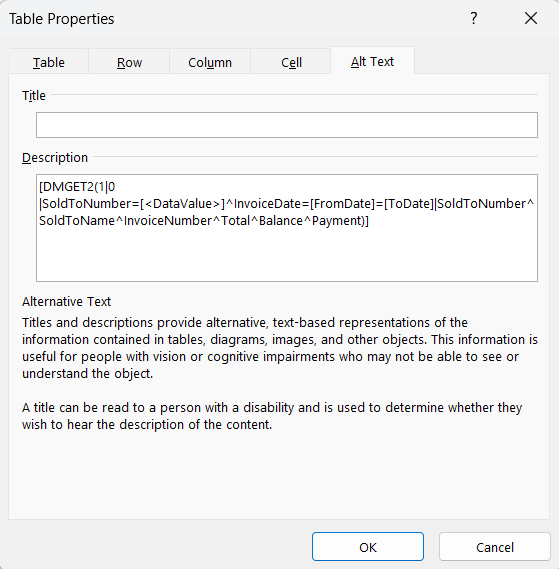
Then in one row you add placeholders for the data elements like you did for Line Item and E-form tables. You need to use the PROP variable to pull out the proper values per column and use # for the row number placeholder. Then when the merge happens a row is added for each Record from the search and the proper values are placed into the rows. Here is a sample Record Search table that has 4 fields – Invoice, Amount, Vendor, and Terms,. Notice the [PROP()] syntax with the [TableData] variable. [TableData] is replaced with the search results. Also notice that instead of using the line number you use a # sign. This will be replaced with the line numbers during the merge.

NOTE: Search Results table support was added in version 4.04.
PDF Templates
PDF templates are similar to Word template except you need to use Adobe Acrobat (not the reader) to make them. They are mainly used for form-oriented merging like a W9 or some other precisely laid out official form. They are less flexible than Word forms for inserting text into the middle of paragraphs because you are limited to using PDF Fields to hold your data. If you want to have a PDF output of a letter where your text is merged into the sentences, we would suggest using Word and having the system convert it to PDF for you.
Open your PDF in Acrobat and use the Tools / Prepare Form option. Adobe will attempt to place fields where it thinks they may belong. When it is done you can then remove those automatically placed if needed and place your own. On the “Prepare Form” toolbar in Adobe you will see a series of field types. Click on the “Add a Text Field” button and then click on the document where you wish to place your data. Name the field the same as you named the field in DocMgt.
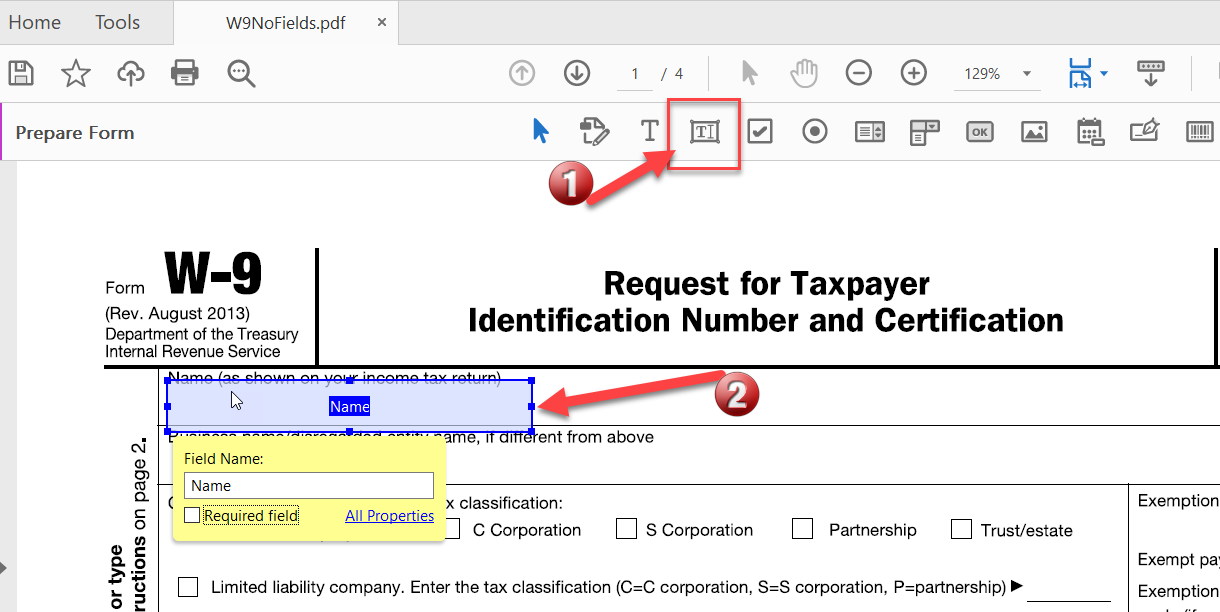
This is how DocMgt knows what data to place in each field – by its name. If you need to place more than a single DocMgt field into a PDF field you can also use variables. For instance, to place “FirstName” and “LastName” from DocMgt into a single PDF field use the name “[FirstName] [LastName]” (no quotes). This tells DocMgt to concatenate the first and last name into your PDF field.
If you wish to place check boxes and have them checked if a certain value is set in DocMgt, use a variable that returns 1 for checked and 0 for not checked. Actually “Yes”, “True” and “1” will work for checked and anything else will not check it. Here is an example to check whether the Status field in DocMgt is set to ACTIVE – [IF([Status]|=|Active|1|0)].
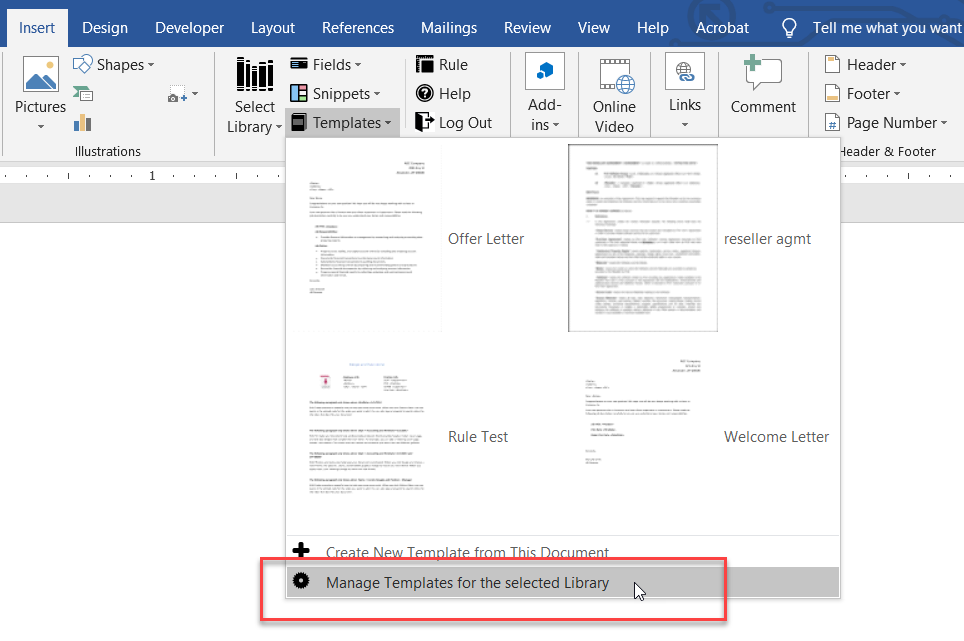
Once you have your fields placed, the next thing to do is to add it to your library in DocMgt. To do this, use the Word Add-In we used above and when you have your library, select Templates and then select “Manage Templates for the Selected Library”. Click the “Upload New Template” button and navigate to your PDF and select it. Give it a name and click OK. Once it saves you will then be able to edit it to set its Category, Sub Category and Name like we did for the Word template.
Log in to your site using your browser and go to a Personnel record (assuming you filed this template away in the same library). In the Merge Forms list you should see your new template. Click that and it will merge the document into your record with the record’s data just as before.
That is it! You should now have a new PDF document in your record that was based on your merge template.
If you make changes to the template and want to update it on the server, use the “Manage Templates for the Selected Library” option in Word, select the template to update from the list then click the “Upload Template” button to find your updated PDF and upload it.
Download the PDF Templates Used in Article
Merging Images in PDFs
Merging images into a PDF document requires that you first insert a blank or temporary image in the place where you want your merged image to go. This allows you to size and place the image exactly where you want the merged version to go. Go to the picture’s properties and set the “Name” property to point to the image you wish to merge.
NOTE: If you are using DocMgt 3.35 or higher, then the format of the strings is the same as the Word method above – i.e. using either IMG: or field name in brackets. The old method (below) is still supported but no longer recommended.
If you are using DocMgt 3.34 or older then read this section!
To merge an image of a document from the record
In the Title property, use the format “DOC|Category|Name” to pull an image from the record. The image will be a rendering of the selected document. For instance, if the image you select is from a Word document then a picture of that word document’s page will be put into your merge document.
- Category = The name of the category to find the document to merge into the PDF
- Name = The name of the document to merge into the PDF
As an example, if you want to put an image of the document in the “Checks” category that is named “Latest” then you would use this string:
DOC|Checks|LatestTo merge a signature from the record data
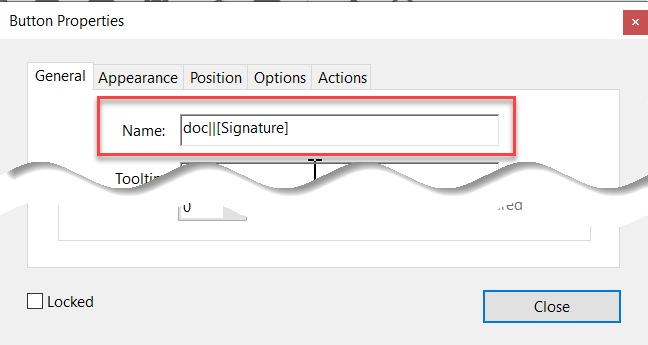
In the PDF image’s Name property, use DOC||[FieldName] to merge that field’s data into the image. It will look something like this:
DOC||[Signature]
REMEMBER That this is the OLD method. For newer system please use the IMG: or [Field] methods described above in the Word section!
Excel Templates
Excel spreadsheets are wonderful for building charts from your data. With DocMgt you can now merge your data into a spreadsheet just like you do with Word and PDF. All you have to do is add variables to your spreadsheet that match the values in DocMgt. For instance, if you want to place the employee’s name in a cell you would enter [Name] in the text where you want the name to show up. Same for all other variables.
Once you have your fields placed, the next thing to do is to add it to your library in DocMgt. To do this, use the Word Add-In we used above and when you have your library, select Templates and then select “Manage Templates for the Selected Library”. Click the “Upload New Template” button and navigate to your XLSX file and select it. Give it a name and click OK. Once it saves you will then be able to edit it to set its Category, SubCategory and Name like we did for the Word template.
Alternatively, if you are an Admin user, you can go into the Admin / Record Types and select the RecordType you wish to add the template into. Then go to the Merge Templates section and add an entry there manually. If you want to update the template, you can simply open that entry and re-select the new template file to use and save.
Log in to your site using your browser and go to a Personnel record (assuming you filed this template away in the same library). In the Merge Forms list you should see your new template. Click that and it will merge the spreadsheet as a document into your record with the record’s data just as before.
That is it! You should now have a new Excel document in your record that was based on your merge template.
If you make changes to the template and want to update it on the server, use the “Manage Templates for the Selected Library” option in Word, select the template to update from the list then click the “Upload Template” button to find your updated XLSX file and upload it.
Download the XLSX Template Used in Article